Your online store’s design is more than just a pretty layout—it’s how you build trust and turn visitors into loyal customers. But how do you create a beautiful, on-brand experience without hiring a developer? The answer is the Shopify theme editor.
This powerful visual tool gives you complete control over your site’s look and feel, no coding skills required. In this step-by-step guide, we’ll show you exactly how to edit your Shopify website, from finding the editor to making the essential changes that drive sales.
If you haven’t started yet, you can follow along with this guide by signing up for a free Shopify trial and exploring the editor yourself.
- 1. Establish Your Brand: Upload Your Logo & Favicon
- 2. Craft Your First Impression: Customize the Homepage Hero Banner
- 3. Build Trust & Drive Action: Set Up Your Announcement Bar and Footer
- 4. Unify Your Design: Setting Brand Colors and Typography
- 5. Fine-Tune Your Store’s Language: Using the “Default Theme Content” Editor
Before You Touch Anything: The #1 Rule of Shopify Theme Editing
Before you change a single color or font in Shopify theme editor, it’s crucial to follow the golden rule: always work on a backup. Editing your live theme directly is risky; a small mistake could disrupt your customers’ shopping experience. Creating a duplicate copy gives you a safe environment to experiment freely without any pressure.
Making a backup takes less than a minute. Here’s how:
- From your Shopify admin, navigate to Online Store > Themes.
- On your current, live theme, click the three-dot menu button (…).
- Select Duplicate from the dropdown menu.

A copy of your theme will be created and added to your theme library. My advice is to make all your edits on this duplicated version. Once you’re happy with the changes, you can publish it to make it your new live theme.
💡If you are nervous about this transition, follow our step-by-step guide on how to change your Shopify theme safely to ensure zero downtime for your shoppers.
Where is Shopify Theme Editor? A 60-Second Guide
Finding Shopify theme editor is simple and takes just a few clicks from your main dashboard. Here’s the path to your store’s creative command center:
- Log in to your Shopify admin.
- On the left-hand navigation menu, click on Online Store. This will automatically open the Themes section.
- Find the theme you want to edit (we recommend your duplicated copy) and click the Edit theme button.

A Visual Tour of Your Command Center: Understanding the Editor Interface
Opening Shopify theme editor for the first time reveals your central hub for store customization. It’s neatly organized into two main areas: a live preview of your store on the right and a powerful settings sidebar on the left. Let’s break down each component so you can navigate it with confidence.
The Main Preview & The Interactive Preview Inspector
The large window on the right is your Main Preview, which shows a fully interactive, real-time version of your store. As you make changes in the sidebar, you will see them reflected here instantly.
One of the most powerful features here is the Preview Inspector. Instead of hunting for a setting in the sidebar, you can simply click directly on any element in the preview window. Doing so automatically opens its specific customization options in the left-hand panel.

As you work in the preview, selected elements are highlighted in blue. You can also add new content directly from the preview itself. For example, you can add a section above or below the selected section. This makes the editing experience much more visual and intuitive, and helps you build pages faster without constantly navigating through the sidebar.
The Sidebar: Sections, Blocks, and Theme Settings
The left sidebar of Shopify theme editor is where you will control every aspect of your store’s design. It’s organized into a clear hierarchy that’s easy to understand once you know the difference between its main tabs.
Sections: Think of Sections as the large, modular building blocks that make up a page. Your homepage might have a “Featured Collection” section, a “Testimonials” section, and an “Email Signup” section. You can add, remove, and drag-and-drop these to restructure your page layout.
Blocks: Blocks are the individual pieces of content that live inside a Section. For example, within a “Multicolumn” section, each column (containing an image, a heading, and text) is a separate Block. This allows you to reorder content within a section.

⚙️Theme Settings: This is where you control your store’s global styles. Changes made here affect your entire website, ensuring a consistent brand identity. This is where you will set your brand colors, choose your typography (fonts), upload your logo, and add social media links.

Essential Tools: Page Selector, Device View, and Undo/Redo
At the top of Shopify theme editor, you will find a handful of essential tools that complete your command center.
Template Menu: In the top-center area, you’ll see your theme information along with the market and template menus. The template menu shows the page or template you’re currently viewing, such as Home page, and lets you switch to other templates like product pages, collection pages, or blog pages so you can customize their layouts.
Mobile Preview: Rather than separate desktop and smartphone icons, the current editor includes a mobile preview control on the right side. You can use it to quickly check how your store looks on a mobile layout while editing. With recent data from Statista showing that smartphones now drive an incredible 78% of global retail traffic, checking your design in the mobile view isn’t just a suggestion—it’s essential for success.
Undo/Redo: Don’t be afraid to experiment. The undo and redo controls in the top-right corner let you reverse or restore changes during your current customization session. When you’re happy with your edits, click Save to keep them.

The First 5 Edits Every New Shopify Store Should Make
We have created a simple, actionable checklist to help you customize your Shopify theme, transforming it from a generic template into a trustworthy storefront. Completing these five edits will lay a solid foundation for your brand and start you on the path to making sales.
💡If you are still mapping out your broader strategy before diving into design, make sure to read our complete playbook on how to start a Shopify business from scratch.
1. Establish Your Brand: Upload Your Logo & Favicon
Your logo is the visual cornerstone of your brand, and it needs to be the first thing you add to your store. In Shopify theme editor, navigate to the top bar and click on ⚙️Theme Settings > Logo. Here, you can upload your logo image. According to Shopify’s Help Center, it is best to use a logo that is a maximum of 450 by 250 pixels to ensure it looks sharp without slowing down your site.
Do not forget the favicon—that is the small icon that appears in the browser tab next to your page’s title. It is a small detail that makes your brand look established and helps customers find your tab when they have multiples open. You can upload a square image (usually 32 by 32 pixels) in the same settings panel.
2. Craft Your First Impression: Customize the Homepage Hero Banner
The first thing a visitor sees on your homepage is the “hero” banner. This is your digital billboard, and you have about three seconds to capture their attention. You can find this in the sidebar under Sections > Image Banner (or a similar name, depending on your theme, like the popular Dawn theme).
To make it effective, focus on these three elements:
- The Image: Choose a high-resolution photo that clearly showcases your product or evokes the lifestyle your brand represents. I always suggest you avoid generic stock photos.
- The Headline: Write a short, benefit-driven headline. Instead of “Our New Collection,” try “Effortless Styles for Modern Living.”
- The Call-to-Action (CTA): Your button text should be clear and action-oriented (“Shop Now,” “Explore the Collection”). Most importantly, use the block settings to give the button a high-contrast background color so it stands out from the image and is easy to see.

3. Build Trust & Drive Action: Set Up Your Announcement Bar and Footer
Two of the most overlooked but crucial areas for building customer trust are the announcement bar at the very top of your site and the footer at the very bottom.
The Announcement Bar is typically found in your Header section’s settings. Use it to communicate a key selling point or promotion, like “Free Shipping on Orders Over $75” or “New Arrivals Just Dropped.” This immediately answers a critical customer question and can reduce cart abandonment.

The Footer is where shoppers look for proof that you are a legitimate business. Go to the Footer section and make sure to:
- Add links to your business social media pages through Theme Settings > Social media.
- Enable payment icons (a simple checkbox in the footer’s settings) to show customers you accept trusted payment methods like Visa, Mastercard, and PayPal.
These simple additions provide powerful social proof and reassurance.

4. Unify Your Design: Setting Brand Colors and Typography
A consistent visual identity makes your store look polished and professional. In Theme Settings, you will find two tabs to control this: Colors and Typography.
In the Colors panel, you can create and apply color schemes across your entire website. Set your primary brand colors for headings, buttons, and backgrounds. Consistency is key, so avoid using too many clashing colors. For Typography, select one font for your headings and another clean, highly readable font for your body text. Shopify’s built-in font library gives you hundreds of web-safe options to choose from that look great on any device.

5. Fine-Tune Your Store’s Language: Using the “Default Theme Content” Editor
This final edit is a pro-level touch that separates generic stores from polished brands. Sometimes, the default text used by your theme—like “Sold Out” or “Tax”—is not quite right for your brand’s voice or region. You can change this system-wide text.
You can open it directly from Shopify theme editor by clicking the theme name dropdown menu and selecting Edit default theme content.

Or you can go from your Shopify admin to Online Store > Themes, click the three-dot menu next to your theme, and choose Edit default theme content.
A new editor will open where you can search for any term on your site and replace it. For example, you could change “Low stock” to “Only a few left” or edit the automated messages sent via Shopify Email. This ensures every word on your site feels intentionally chosen for your customers.

Advanced Customization (Without Touching Code)
Once you have mastered the essentials, Shopify theme editor offers powerful features that let you further tailor your store’s experience—all without needing to learn Liquid, CSS, or any other coding language. These advanced tools help you create truly unique page layouts and stand out from the competition.
Unleash AI: Create Custom Sections with Shopify AI Editor
One of the most exciting recent updates is the integration of AI to help you build brand-new page sections from scratch. Shopify’s AI tools, sometimes accessed via the Sidekick AI assistant, can generate custom layouts based on simple text prompts.
To use it, click “Add section” in the sidebar and look for the AI generation option. From there, you can describe what you need.
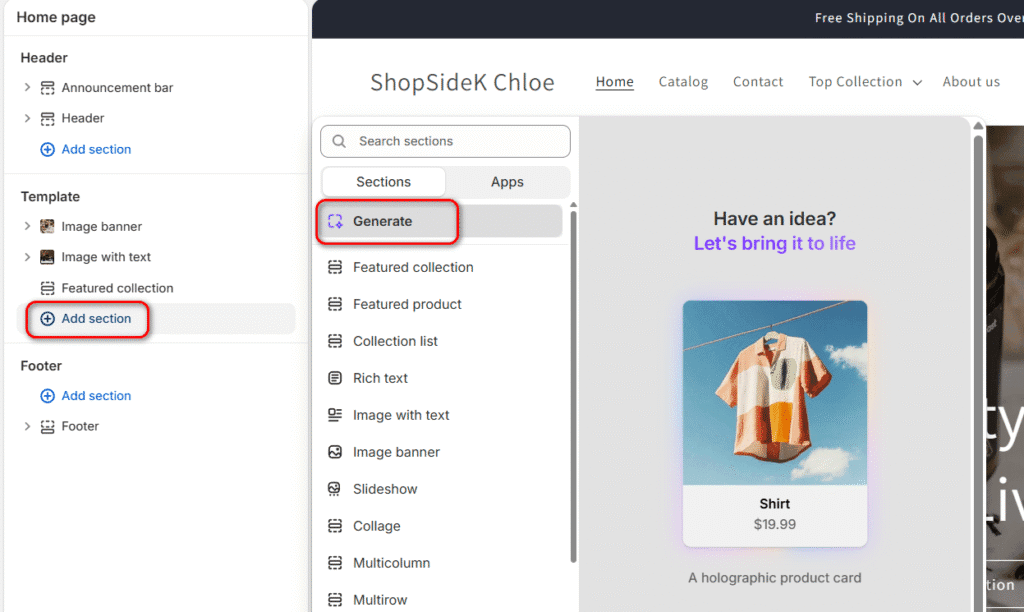
For example, you could type:
- “Create a testimonial section with three customer quotes and star ratings.”
- “Generate a banner for a Black Friday sale with a countdown timer.”
- “Add a section that shows our brand’s sustainability timeline with icons.”

The AI will generate the section’s code for you, and you can then customize the content, colors, and images just like any other block.

Personally, I think this feature is a game-changer for creating unique, conversion-focused content without hiring a developer.

Go Beyond the Homepage: Customizing Product and Collection Page Templates
In the past, Shopify themes often limited this kind of drag-and-drop section-based editing to the homepage. But with modern Online Store 2.0 themes, that power is now available on almost every page of your site, including product pages, collection pages, and even your blog.
🔧 Design Tools Worth Exploring
- Qikify Sales Pop up & Proof – Uses popups, counters, and promo bars to create urgency and build trust
- Qikify Checkout Customizer – Adds extra checkout content, upsells, and custom purchase rules.
This allows you to create far richer and more informative pages. To try it, use the Page Selector dropdown at the top of the editor and navigate from “Homepage” to “Products,” then select your “Default product” template.

Now, when you click “Add section” in the sidebar, you can add new blocks of content directly to all your product pages.
In practice, this is incredibly useful for:
- Adding an FAQ accordion to answer common customer questions.
- Including a “Materials & Care” collapsible tab.
- Showcasing video testimonials or sizing charts.
By customizing these key page templates, you can provide customers with all the information they need to make a purchase right where it matters most.

Once your storefront design is polished, don’t overlook the final step of the customer journey. You can also customize your checkout page with your brand’s logo, colors, and trust-building button copy to ensure a seamless experience from browsing to purchase.
To make things even easier, we’ve embedded a step-by-step video tutorial below so you can see exactly how Shopify theme editor works in action.
Next Steps: Code, Apps, and Getting Help
The visual theme editor is powerful enough to build a beautiful, high-converting store. But as your business grows, you may want to add custom features or layouts that go beyond the standard options. When that time comes, you have three primary paths forward: learn to edit Shopify code yourself, use an app, or hire an expert.
What is Shopify Code Editor?
Beyond the user-friendly visual interface lies Shopify code editor, which gives you direct access to your theme’s underlying files. This is where you can edit Shopify theme CSS, HTML, and Shopify’s own templating language, Liquid. This advanced tool allows for deep, structural customizations—from creating unique element styles to adding new dynamic functionalities.

However, as Shopify’s own help documents advise, this area is intended for developers or users with a strong understanding of web development. A single misplaced character can break your site’s layout or functionality. For the vast majority of store owners, the visual theme editor provides all the power you will ever need to manage your brand’s appearance safely and effectively.
When to Use an App or Hire an Expert
If you need more advanced design capabilities without wanting to code, two excellent options are available.
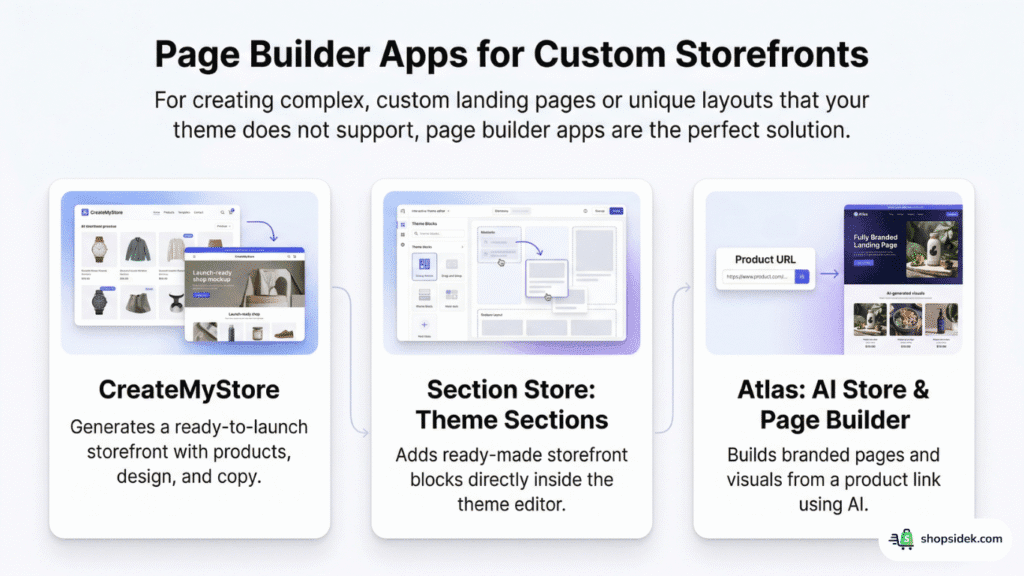
For creating complex, custom landing pages or unique layouts that your theme does not support, page builder apps are the perfect solution.
- CreateMyStore generates a ready-to-launch storefront with products, design, and copy.
- Section Store: Theme Sections adds ready-made storefront blocks directly inside the theme editor.
- Atlas: AI Store & Page Builder builds branded pages and visuals from a product link using AI.
Alternatively, if you have a specific tweak in mind—like changing a button’s behavior or adjusting a single element—hiring an expert can be a smart, time-saving investment. Certified freelance Shopify Partners can quickly and professionally handle targeted tasks, ensuring the job gets done right without you risking your site’s integrity.
Final Checklist & Your Next Step
You now have a complete playbook for mastering Shopify theme editor. By following a few core principles, you can confidently build a stunning storefront that reflects your brand, no prior design or coding experience required.
Here is your final checklist for success:
- Always Duplicate: Start every editing session by creating a backup of your theme for a stress-free experience.
- Navigate with Confidence: Use the sidebar for structure and the interactive preview for direct, visual edits.
- Focus on the Essentials: Complete the first five edits—logo, hero banner, footer, colors, and typography—to lay a professional foundation.
- Think Mobile-First: Continuously check the mobile view to ensure a beautiful experience for every single visitor.
You are now equipped to create a beautiful, trustworthy, and high-converting Shopify store. The only thing left to do is start.
Launch your business and bring your brand to life—begin your free Shopify trial now.

Transparency Note: I’m an official Shopify Media Partner. If you sign up through my link, I may earn a small commission—never at any cost to you. Your support helps keep this blog free and valuable.
FAQs About Shopify Theme Editor
Is Shopify theme editor free to use?
Yes, Shopify theme editor is a core feature included with every Shopify plan at no extra cost. You can use it to fully customize any theme from the Shopify Theme Store, whether you choose a free theme like Dawn or purchase a premium theme. The tool itself is always free; the only potential cost is the theme you choose to edit.
💡If you aren’t sure which design best fits your brand’s unique needs, you can use our Free Shopify theme matchmaker to narrow down your options.
Can I restore a previous version of my theme?
Yes, Shopify automatically saves older versions of your theme each time you click Save. In your Theme library, you can find your current theme and click the three-dot menu to see a list of recent versions you can preview and restore. However, for major redesigns, the safest and most reliable method is to publish the full duplicate copy you created before you started editing.
Will customizing my theme slow down my website?
It can, but this is highly manageable. Shopify theme editor itself is built for performance. The most common causes of a slow store are large, unoptimized images and an excessive number of third-party apps. I’d recommend always compressing your images before uploading them.
While adding sections and blocks has a minimal impact, be mindful of how many apps you install, as each one adds code that can affect loading times. Sticking to Shopify’s built-in features, using optimized media, and starting with one of the fastest Shopify themes is the best way to keep your store running smoothly.