Is your current Shopify theme feeling a little slow, outdated, or just not you anymore? Giving your store a design refresh is one of the most powerful ways to boost your brand and improve the customer experience. But for most store owners, figuring out how to change Shopify theme brings up one major question: what about all my work?
The biggest worry is losing your hard-earned product pages, blog posts, and customer data—or worse, breaking your live store. I understand.
That’s why we created this guide. Here, you’ll find a safe, step-by-step process to ensure your transition is seamless and stress-free. We’ll cover everything from pre-launch prep to post-launch checks, complete with a downloadable checklist to guide you.
If you’re just starting out and want to build from scratch with the perfect foundation, you can start a free trial of Shopify and explore all their new themes risk-free.
- 1. Duplicate Your Current Theme (Create a Safety Net)
- 2. Review Your Apps and Their Requirements
- 3. Locate and Copy Your Custom Code Snippets
- 4. Export Your Products and Customer Lists (Optional Precaution)
- 5. Use Maintenance Mode Strategically (For High-Traffic Stores)
- 6. Benchmark Your Current Site Speed
- 7. Download Your FREE Pre-Change Checklist PDF
Should You Change Your Shopify Theme? 5 Signs It’s Time for an Upgrade
It’s worth remembering that changing your theme is more than a cosmetic tweak. It’s a strategic business decision. Your theme is the foundation of your customer experience and can directly impact your conversions, brand perception, and growth. If you’re on the fence, here are five clear signs that it’s time for an upgrade.
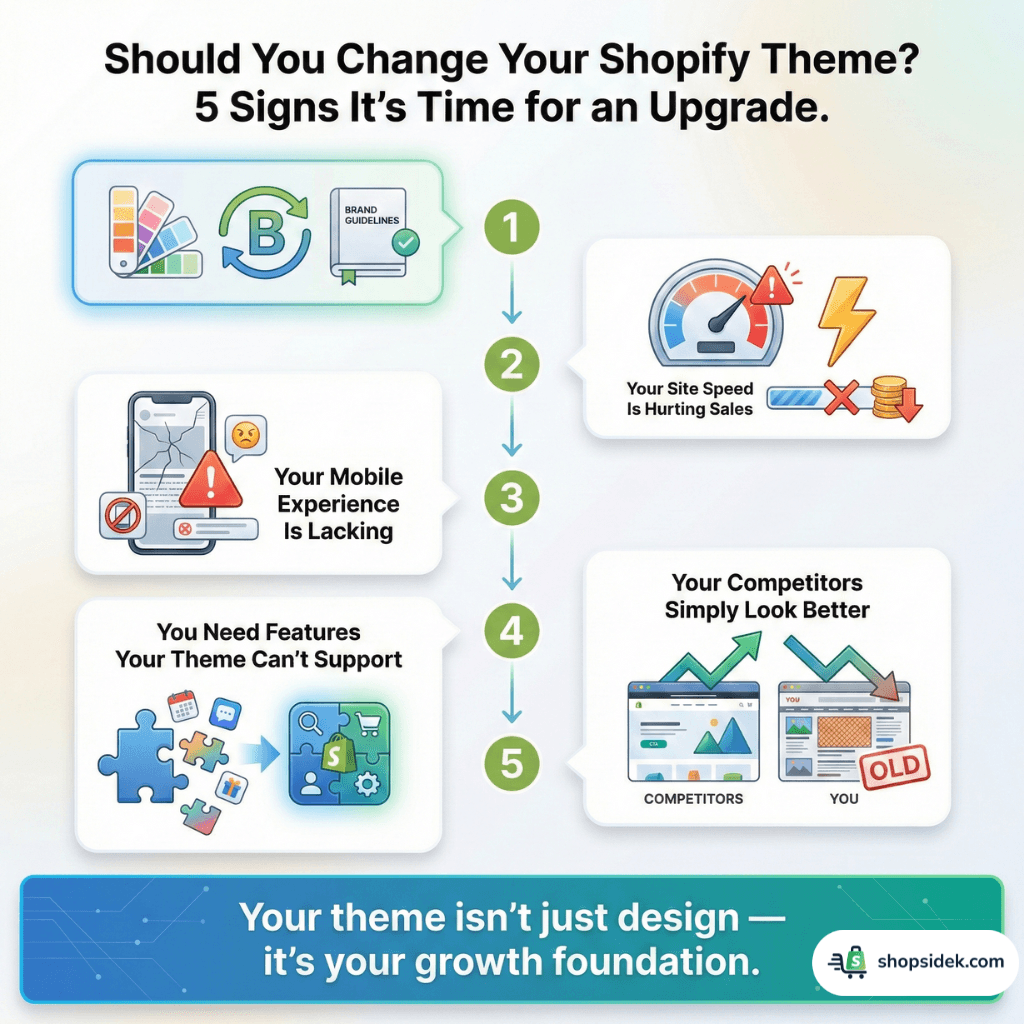
Your Branding Has Evolved
Your business isn’t static, and your website shouldn’t be either. If your branding has matured—with a new logo, color palette, or mission—but your theme is stuck in the past, it creates a jarring experience for customers. A consistent brand presentation can increase revenue, and a new theme is the best way to ensure your storefront perfectly reflects your current identity.
Your Site Speed is Hurting Sales
In eCommerce, speed equals revenue. According to research from Google, 53% of mobile shoppers will abandon a page if it takes longer than three seconds to load. Older themes are often bloated with outdated code and aren’t optimized for modern performance standards. Upgrading to a new, performance-focused theme is one of the fastest ways to improve loading times and reduce your bounce rate.
Your Mobile Experience is Lacking
With over 40% of online transactions happening on mobile devices, a poor mobile experience is no longer an option—it’s a liability. If your current theme isn’t fully responsive or feels clumsy to navigate on a phone, you’re losing customers. Modern Shopify themes are built with a “mobile-first” approach, ensuring a seamless shopping experience for everyone, on any device.
You Need Features Your Current Theme Can’t Support
Are you relying on a dozen different apps to add basic functionality like color swatches, mega menus, or quick-view options? While apps are great, too many can slow down your site and increase costs. Modern premium themes often have these features built-in, providing a cleaner, faster, and more integrated solution right out of the box.
For example, taking a close look at our review of the Impulse theme demonstrates how investing in a premium layout can easily replace several costly third-party apps.
Your Competitors Simply Look Better
First impressions are formed in the blink of an eye. Studies show that visitors form an opinion about your website in as little as 50 milliseconds, and 94% of that first impression is design-related. If your competitors’ stores look more professional, trustworthy, and modern, you are likely losing customers.
If you’ve ever admired a competitor’s site and wanted to know exactly what theme they’re using, you can easily find out with a Shopify Theme Detector to spy on their setup.
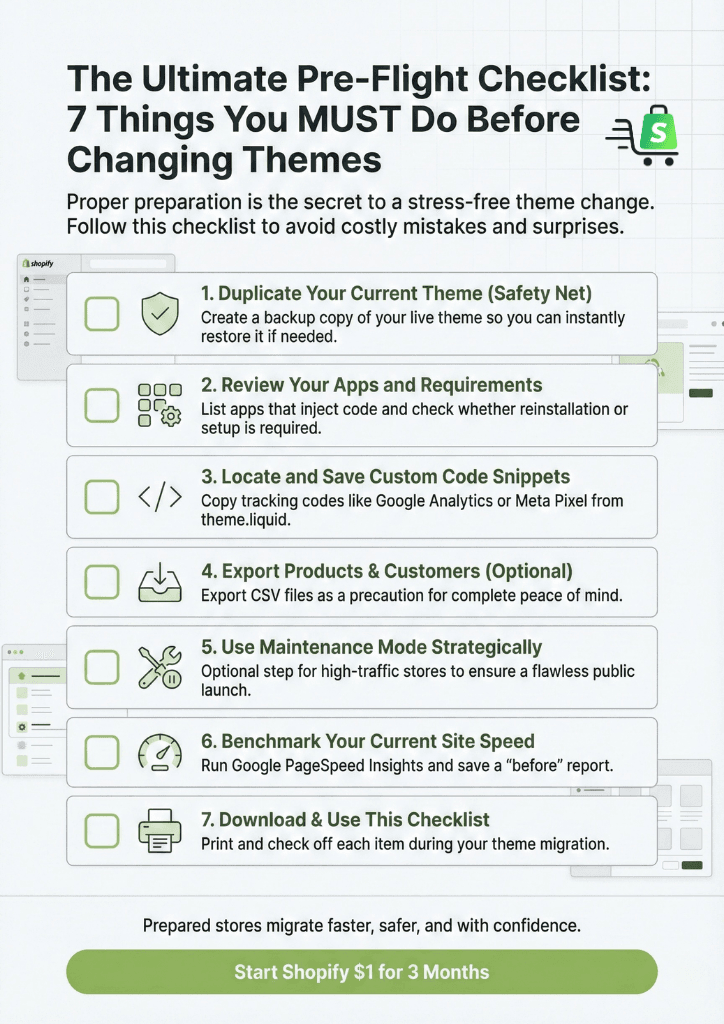
The Ultimate Pre-Flight Checklist: 7 Things You MUST Do Before Changing Themes
Proper preparation is the secret to a stress-free theme change. From my experience, rushing this stage is where 99% of errors happen. By following this pre-flight checklist, you can ensure a smooth transition with no surprises.
To make it even easier, we’ve compiled all these steps into a handy, downloadable PDF you can print and check off as you go.
1. Duplicate Your Current Theme (Create a Safety Net)
Before you do anything else, create a complete backup of your current theme. This duplicate copy is your safety net—if anything goes wrong or you change your mind, you can restore your old store with a single click.
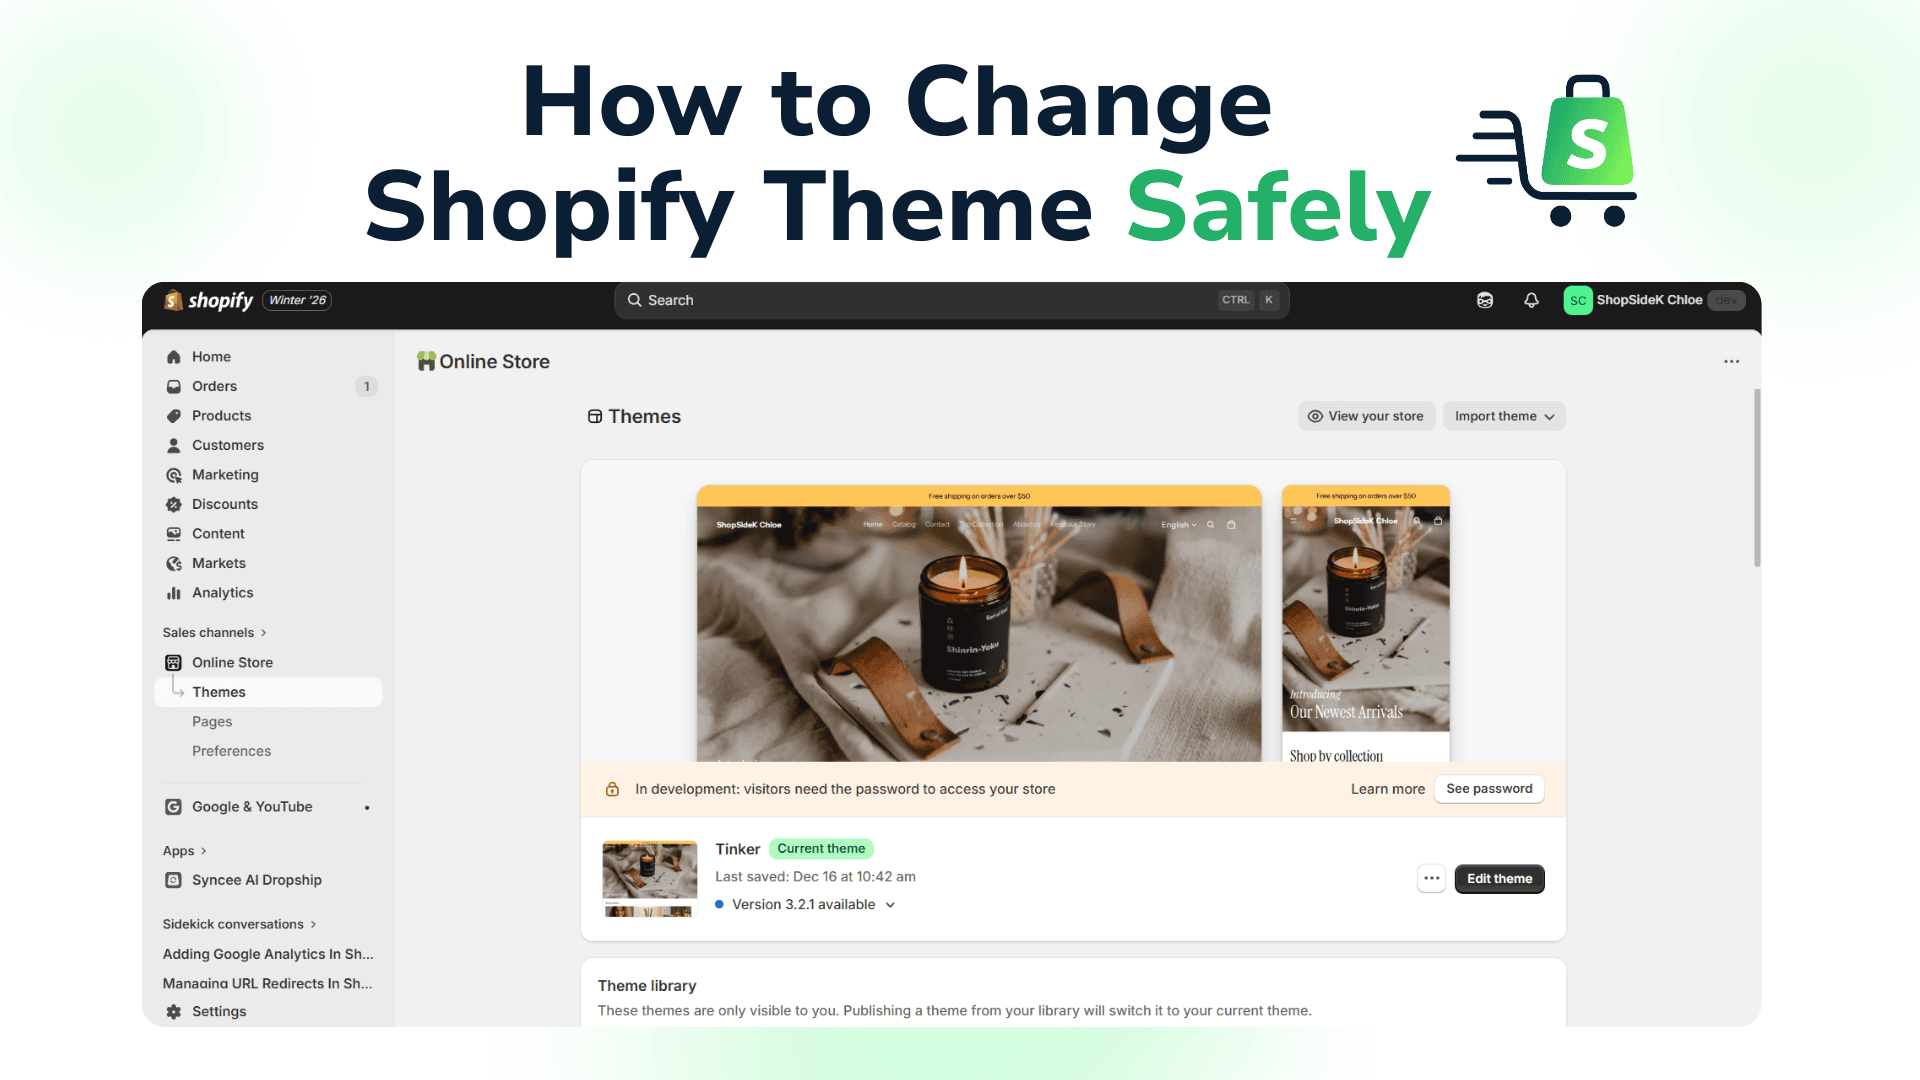
- From your Shopify admin, go to Online Store > Themes.
- Find your current, live theme.
- Click the Actions button (the one with three dots).
- Select Duplicate.
Shopify will create a copy named “[Your Theme Name] (Copy)”. We recommend renaming it to something clear, like “Backup – Jan 2026” for easy reference.

2. Review Your Apps and Their Requirements
Many Shopify apps work by injecting code directly into your theme’s files. When you change themes, this code doesn’t automatically transfer. Take a few minutes to review your installed apps and make a list of the ones essential to your store’s functionality. Check their documentation or support pages to see if you’ll need to reinstall or reconfigure them after the new theme is live.
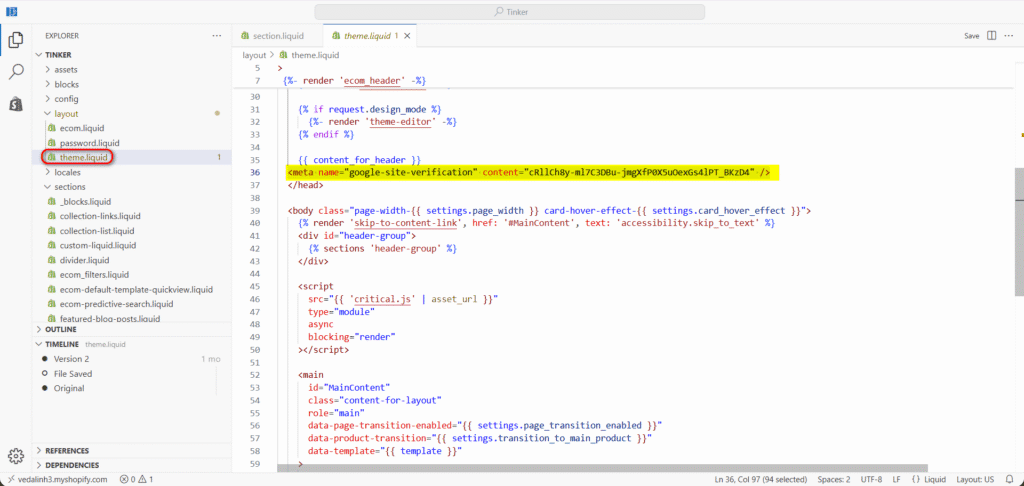
3. Locate and Copy Your Custom Code Snippets
From what I’ve seen, this is a crucial step that many merchants miss. “Custom code” refers to any snippets you’ve manually added to your theme for tracking or styling. This commonly includes things like your Google Analytics tag or Meta (Facebook) Pixel.
You can typically find these in your theme’s main code file:
- Go to Online Store > Themes > Actions > Edit code.
- In the file directory on the left, open the theme.liquid file.
- Look inside the <head>…</head> section for code blocks often marked with comments like <!– Global site tag (gtag.js) – Google Analytics –> or <!– Meta Pixel Code –>.
Copy these entire code blocks and paste them into a text document for safekeeping. You’ll need to add them back to the theme.liquid file of your new theme.
4. Export Your Products and Customer Lists (Optional Precaution)
To be clear, your products, collections, customers, pages, and blog posts are all safe. This data is part of the core Shopify platform and is not tied to your theme. However, for complete peace of mind, taking a moment to export your product and customer lists as a CSV file is a wise, “just-in-case” precaution.
5. Use Maintenance Mode Strategically (For High-Traffic Stores)
For most stores, enabling maintenance mode isn’t necessary. Your live site remains completely active and untouched while you customize your new theme in the background.
However, for high-traffic stores where even a few minutes of potential disruption could impact sales and customer trust, you can use the password page to create a brief, zero-risk launch window. This professional approach ensures no customer sees the new theme until you’ve given it the final green light.
Here’s the process:
- Finalize all your customizations on the new, unpublished theme.
- Just before you’re ready to go live, enable your password page (“maintenance mode”) on your current store.
- Immediately publish your new theme.
- While the store is still password-protected, perform your final critical checks on the live site. Test the checkout process, key apps, and mobile navigation.
- Once you’ve confirmed everything is working perfectly, disable the password page.

This method ensures the public reveal is instant and flawless. For stores with lower traffic, this step is optional, but it’s a best practice for established brands that can’t afford even a moment of unexpected downtime.
6. Benchmark Your Current Site Speed
One of the key reasons for a theme change is to improve performance. Before you switch, run your current site through Google PageSpeed Insights and save the report. This gives you a “before” snapshot. After your new theme is live and configured, you can run the test again to measure the improvement and validate your investment.
🔧 Tools Worth Exploring for Store Optimization
- Tiny SEO Speed Image Optimizer – Improves site speed, compresses images, and fixes technical search issues.
- StoreSEO: AI SEO Blog & Image – Improves search visibility with AI-generated optimizations and schema support.
- SEO Manager – Helps manage metadata, broken links, and search snippet controls.
7. Download Your FREE Pre-Change Checklist PDF
Feeling overwhelmed? Don’t be. To ensure you don’t miss a single step, we’ve turned this entire pre-flight process into a simple, one-page PDF checklist. Download it, print it out, and check off each item as you go for a flawless theme migration.
How to Change Shopify Theme: The 3-Step Process
With your preparation complete, you can relax. You’ve done the hard work of creating a safety net and saving your critical information. Now, for the exciting part: installing and launching your new theme. This process is surprisingly simple.
Step 1: Find and Install Your New Theme
Your first task is to add the new theme to your Shopify store’s theme library. You have two primary options for this.
Option A: The Shopify Theme Store
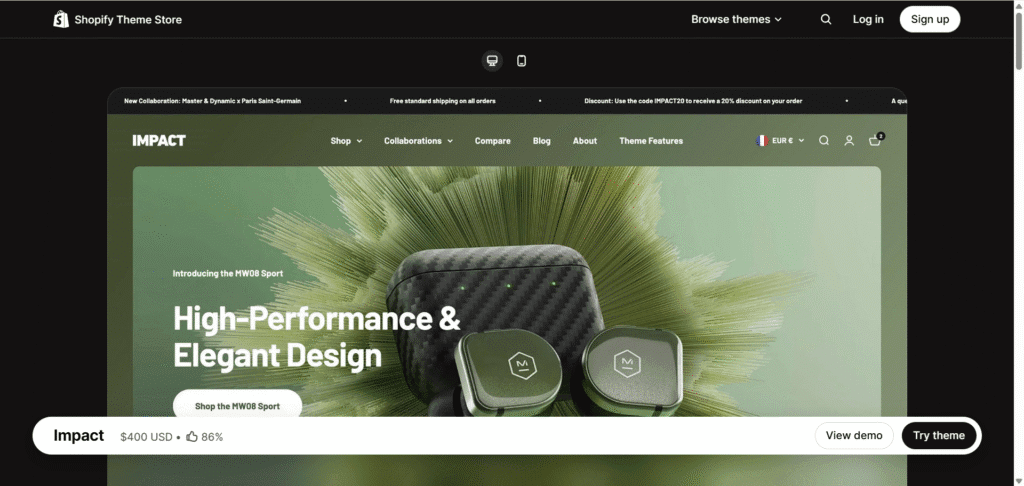
This is the easiest and most secure method. You can browse a curated collection of free and premium themes directly from your Shopify admin.
💡If you prefer to start with a reliable, free foundation, read our definitive deep dive into the Dawn theme to see why it’s the platform’s standard.
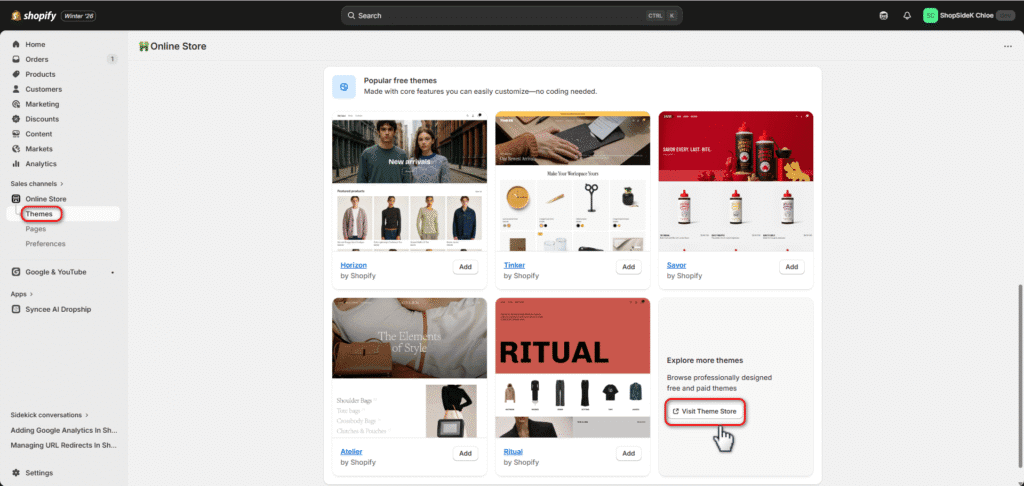
- In your dashboard, navigate to Online Store > Themes.
- Scroll down and click Visit Theme Store.
- When you find a theme you like, click Try theme. Shopify will automatically add it to your theme library, where it will remain unpublished until you’re ready.
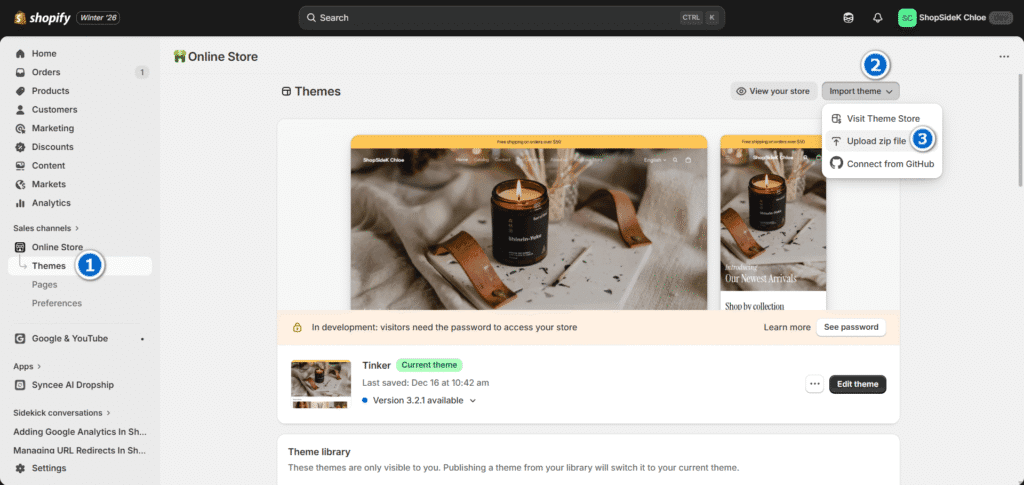
Option B: Third-Party Marketplaces
If you bought a theme from a marketplace like ThemeForest, you would have received a .zip file.
- From the Online Store > Themes page, find the “Theme library” section.
- Click the Import theme button and select Upload zip file.
- Upload the file you downloaded from the marketplace. Shopify will install it into your library.
Step 2: Customize and Preview Your New Theme
Your new theme is now installed but not yet visible to customers. This is your sandbox. You can work on perfecting the design without affecting your live store in any way.
Next to your new theme’s name in the library, click the Edit theme button.

This will open the Shopify theme editor, where you can:
- Adjust global settings: Set up your brand’s typography, color schemes, and social media links.
- Upload your logo: Add your logo and favicon in the “Header” section.
- Re-add custom code: Navigate to the code editor (Actions > Edit code) and paste the Google Analytics and Meta Pixel snippets you saved earlier into the new theme’s theme.liquid file.
- Build out your homepage: Arrange and customize the sections to match your brand’s story.
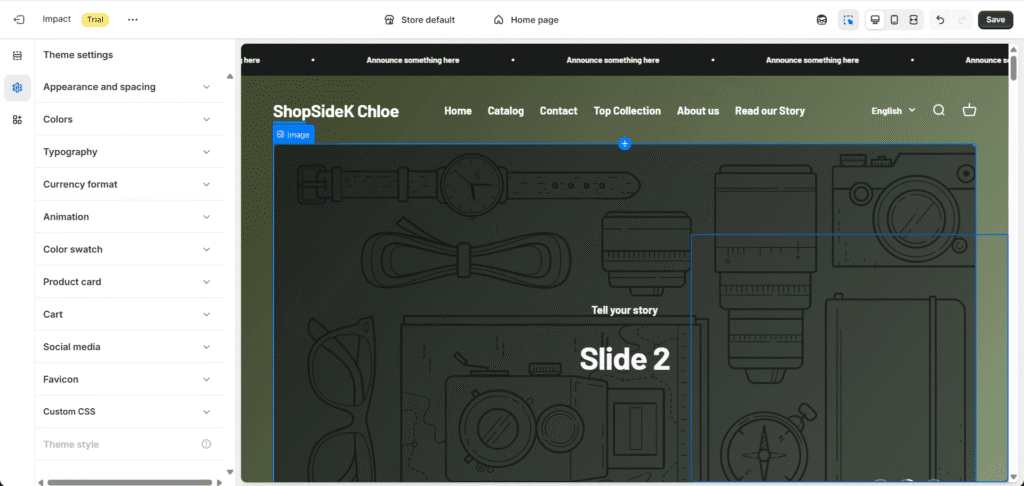
Use the preview function extensively to see how everything looks on both desktop and mobile. Click through to your product pages, collections, and blog posts to ensure everything is displaying correctly.
Step 3: Publish Your Theme and Go Live
Once you’ve previewed every page and are completely happy with how your new store looks and functions, it’s time to go live.
- Return to the Online Store > Themes page.
- Find your new, customized theme in the “Theme library.”
- Click the Publish button.

Shopify will show a final confirmation pop-up. Click Publish again, and your new theme will instantly replace the old one as your live storefront. Congratulations, your store has a brand-new look!
With your beautiful new theme now live, you have the perfect canvas. Start your free Shopify trial today to unlock all the features you need to grow your sales.
If you’d like to see these ideas illustrated in action, check out the video I’ve prepared.
What Is Lost When Changing Themes? (And What Is Safe)
This is the most critical question, and the answer provides a lot of relief: changing your theme does not delete your core business data. Your products, customers, and orders are all safe.
The key is understanding that Shopify separates your store’s foundational data from the theme, which is just the “storefront” that displays it. Think of it like changing the frame on a painting; the artwork itself remains untouched.
Here’s a clear breakdown of what is safe versus what you’ll need to reconfigure.
| ✅ SAFE (Tied to Your Shopify Account) | ⚠️ AT RISK (Tied to Your Old Theme) |
|---|---|
| Products, Collections & Inventory | Theme Editor Settings (Colors, fonts, layout choices, homepage section order) |
| Pages & Blog Posts (Your written content is secure) | Custom Code Snippets (HTML/CSS/Liquid modifications, including tracking codes like your Meta Pixel and Google Analytics tag) |
| Navigation Menus (Your main menu and footer links) | App-injected Code (Some apps add code to theme files; they may need to be reinstalled or reconfigured for the new theme) |
| Customer Data, Orders & Discounts | Theme-Specific Page Templates (Custom templates you created for pages or products in the old theme) |
| General Shopify Settings (Payments, shipping, taxes, checkout settings) | Page Builder Content (Content built with apps like Shogun or Ecomposer may be tied to the old theme; check with your app provider) |
In short, anything you manage from the main Shopify dashboard (like “Products” or “Orders”) is safe. Anything you configured inside the theme editor’s “Customize” screen will need to be set up again in your new theme. This is why the preparation steps we covered earlier are so important.
Expert Q&A: Avoiding the Most Common Theme-Change Mistakes
To help you navigate the process like a pro, we asked two Shopify experts for their advice. Here’s what they had to say about the biggest mistakes to avoid and how to decide if a premium theme is right for you.
What is the #1 mistake merchants make when changing themes?
The biggest mistake is a failure to test. Merchants spend weeks learning how to customize Shopify theme. And the second it looks good, they hit ‘Publish’ and walk away. They forget to run a full test order, check how it looks on a friend’s Android phone, or make sure their most important app is still working. A beautiful site that leaks sales because the mobile checkout button is broken is a disaster. Always dedicate an hour post-launch to a thorough top-to-bottom review of the live site.
— Anna Reid, Founder of Juniper Commerce
When is a premium Shopify theme worth the investment?
A premium theme stops being an expense and becomes an investment the moment it solves a problem that would have cost you more in apps or lost sales. If you need advanced features like color swatches, mega menus, or enhanced product filtering, a premium theme that includes them out-of-the-box is almost always cheaper and faster than trying to add them with multiple paid apps. It’s not just about a better design; it’s about better performance, dedicated support, and a more streamlined tech stack.
— David Chen, Lead eCommerce Strategist at Pivot & Scale
💡Reading through a comprehensive Prestige theme review, for instance, perfectly illustrates how high-end design and advanced functionality come seamlessly packaged together.
After You Publish: Your 3-Point Post-Launch Plan
Your new theme is live, but your work isn’t quite done. The first few hours and days are critical for catching any small issues and ensuring the new design is actually improving your business metrics. This simple post-launch plan will help you monitor, optimize, and validate your theme change.
1. Test All Critical Functionality
What I usually tell clients is, don’t assume everything works just because it looks good. Go through your site as if you were a brand-new customer on both desktop and mobile devices. Pay close attention to the most important conversion paths:
- The Checkout Process: Add a product to your cart, go through the entire checkout process, and complete a test transaction.
- Forms: Test your contact forms, email newsletter sign-ups, and any other forms on your site.
- Key Apps: Make sure your product review apps, pop-ups, and live chat widgets are all loading and functioning correctly.
- Navigation: Click every link in your main menu, footer, and on your homepage to ensure there are no broken links.
2. Check Your Analytics
Data is your best friend. For the first few days after launch, keep a close eye on your Shopify Analytics. You’re looking for any dramatic changes—positive or negative—in key metrics like:
- Online store conversion rate
- Bounce rate
- Average session duration
Compare these numbers to the week before you made the change. Also, run your site through Google PageSpeed Insights again to compare your new “after” score with the “before” benchmark you took. This will confirm if the new theme delivered the performance improvements you were hoping for.
3. Solicit Customer Feedback
Analytics tell you what is happening, but your customers can tell you why. Don’t be afraid to ask your audience what they think of the new design. You can gather valuable qualitative feedback through simple methods like:
- Adding a short pop-up survey asking for first impressions.
- Posting on social media and asking for comments.
- Sending an email to your customer list announcing the new look and inviting replies.
Conclusion: Your New Theme is Just the Beginning
Changing your Shopify theme can feel like a major undertaking, but as this guide has shown, the secret to success isn’t complicated—it’s preparation. By following a clear pre-flight checklist and understanding the process step-by-step, you can confidently refresh your store’s design without risking any of your valuable data.
Your theme is more than just a layout; it’s the digital home for your brand and the foundation of your customer experience. Upgrading it is a powerful and exciting step toward building a more professional, faster, and more profitable business.
You have the complete playbook. Don’t wait to build the store you’ve been dreaming of. Sign up for Shopify’s free trial now and make it a reality 👇

Friendly Disclosure: As a Shopify Media Partner, I may receive a small commission if you sign up using my link. It doesn’t affect your price and supports the work I do here.
FAQs About Changing Shopify Themes
Here are answers to the most common questions we see from merchants about switching their Shopify theme.
1. Will changing my Shopify theme affect my SEO?
Yes, it can—both positively and negatively, but the risks are easy to manage. A modern theme from the Shopify Theme Store is typically faster, more mobile-friendly, and built with current SEO best practices, which can actually improve your search rankings.
The main risks come from losing custom code (like schema markup) or significant changes in your URL structure, but these are rare. By following the pre-flight checklist and carefully saving your tracking and analytics codes, you can minimize any potential negative impact.
To dive deeper into optimizing your store for search engines, our Ultimate Shopify SEO Playbook is the perfect resource.
2. Can I switch back to my old Shopify theme?
Absolutely. When you publish a new theme, your old one is not deleted. It simply becomes an “unpublished” theme in your Online Store > Themes library. Furthermore, because you followed this guide and duplicated your original theme before starting, you have a perfect backup ready to go. You can republish your old theme at any time with a single click from the “Actions” menu.
3. How long does it take to change a Shopify theme?
The technical part of installing a theme and clicking “Publish” takes less than five minutes. The real time investment is in preparation and customization. You should budget:
1-2 hours for preparation: This includes completing the pre-flight checklist, backing everything up, and saving your code snippets.
2-8 hours for customization: This is the most variable step. Configuring your new theme’s settings, redesigning the homepage, setting up colors and fonts, and testing your apps can range from a couple of hours for a simple store to a full day for a more complex one.
4. If I bought a theme, do I have to pay again for updates?
For any theme purchased directly from the official Shopify Theme Store, all future updates are included for free. When a developer releases a new version with bug fixes or new features, you will see a notification in your theme library prompting you to add the updated version. Keep in mind that a theme license is for a single store, so if you open a second store, you would need to purchase a new license for it.
5. What are the best Shopify themes for conversions?
Personally, I think you should focus on finding a theme with the best qualities for conversion, instead of a single “best” theme. The highest-performing themes all share a few key traits: they are extremely fast-loading, feature a mobile-first design, offer clear and simple navigation, and include built-in conversion features like quick-view for products, prominent call-to-action buttons, and sections for trust badges or customer testimonials.
💡If you’re feeling overwhelmed by the choices, our Shopify theme matchmaker can quickly pair you with the perfect layout for your industry and catalog size.