That spark of a business idea is exhilarating, but it quickly leads to the big question: how to start a Shopify business that’s actually profitable? It’s easy to get stuck between planning your products and navigating the technical steps, unsure of how to move from a great concept to your very first sale.
That’s why we created this founder’s playbook. This is more than a technical checklist; it’s a strategic guide to starting a Shopify business, designed to walk you through three crucial stages: the Blueprint (planning your strategy), the Build (setting up your store), and the Boost (launching and growing).
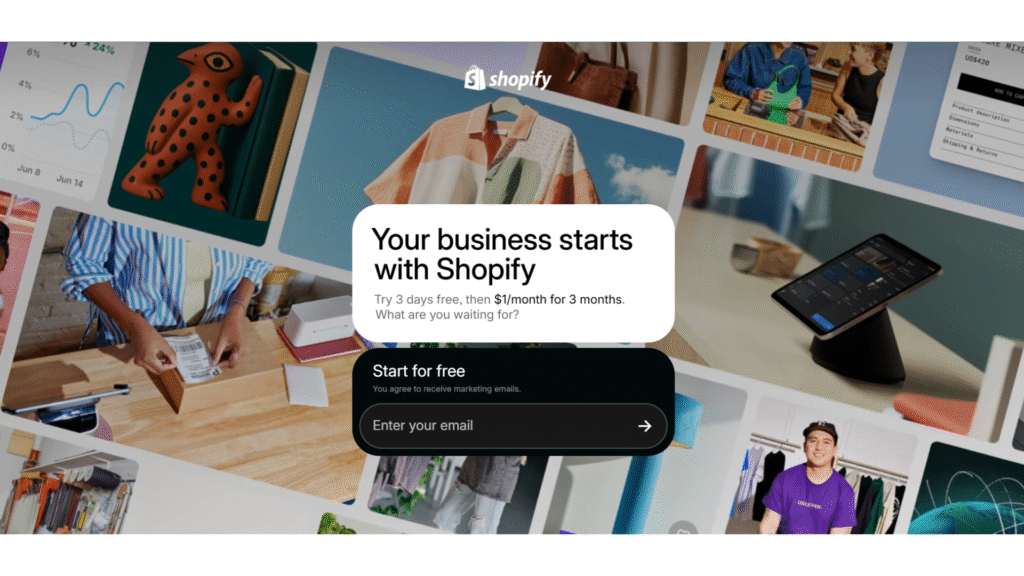
This guide will show you exactly how to start a Shopify business, transforming your ambition into a fully functional brand. To make it even easier, you can start your free Shopify trial here and build your store right alongside us.
If you prefer watching to reading, I’ve recorded a complete video version of how to start a Shopify business.
🗺️ Stage 1: The Blueprint — Planning Your Business Before You Build
Every successful store starts long before the first product is listed. The most critical work happens at the blueprint stage, where you validate your idea, choose the right business model, and understand the costs involved.
Rushing this phase is a common mistake for those learning how to start a Shopify business. But getting it right sets you up for long-term success.
How to Find a Profitable Niche and Product Idea
The best business ideas live at the intersection of your passion, your expertise, and a genuine market need. While “follow your passion” is good advice, “solve a problem” is what creates customers.
Start by identifying a broad area you’re interested in, then narrow it down. If you need a creative spark to get started, exploring a list of what to sell on Shopify can uncover hundreds of winning product ideas.
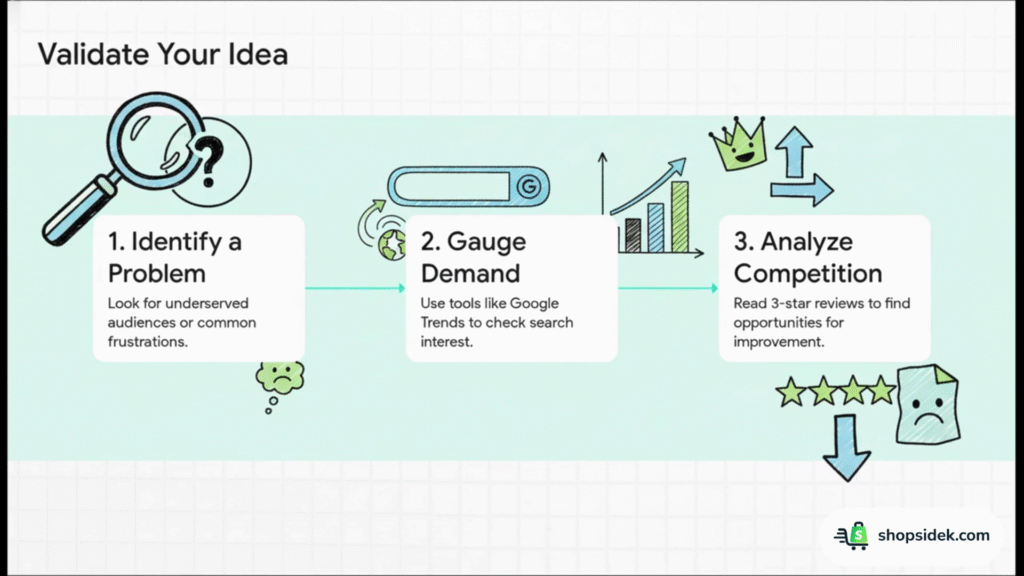
A simple framework for validation involves three steps:
- Identify a Problem or Gap: Look for underserved audiences or common frustrations. Natalie Busch, the founder of the Shopify store TiScrubs, did exactly this. As a physician assistant, she was frustrated by the boxy, uncomfortable scrubs available. She saw a gap in the market for high-performance, athletic-style medical wear and created a product to fill it.
- Gauge Demand: Use free tools to see if people are actively searching for a solution. With Google Trends, you can check the search interest for your product ideas over time. Is it a growing trend or a fading fad?
- Analyze the Competition: Browse marketplaces like Amazon and Etsy to see what’s already selling. Look at the best-sellers, but more importantly, read the 3-star reviews. What are customers complaining about? Those complaints are your opportunities to create something better.
Choosing Your Business Model: Dropshipping, Print-on-Demand, or Your Own Product?
Once you have a product idea, you need to decide how you’ll source and sell it. Choosing the right approach is the first step in learning how to make money on Shopify. Our complete guide explores 9 proven business models you can consider; below are three of the most popular and accessible paths for new entrepreneurs.
Dropshipping
You sell products from a third-party supplier who ships directly to your customer. You never handle inventory yourself. For a complete walkthrough, our definitive guide on how to dropship on Shopify covers everything from finding suppliers to marketing your first product.
- Pros: Very low startup costs, no need to manage inventory, wide product selection.
- Cons: Lower profit margins, reliant on supplier stock and quality, less control over branding and shipping.
- Tools to Use: Apps like DSers and Spocket integrate directly with Shopify to make finding and listing products simple.
Print-on-Demand (POD)
You create custom designs for products like t-shirts, mugs, or posters. When an order comes in, a POD service prints and ships it for you. This model is perfect for creators, artists, and designers who want to sell their work without handling inventory. To master this creative business model, explore our ultimate guide to Shopify print on demand.
- Pros: No inventory, huge creative freedom, easy to test new designs.
- Cons: Lower profit margins, limited to the supplier’s product catalog, you are responsible for handling customer service for print or shipping errors.
Manufacturing/Handmade (Your Own Product)
You either create the products yourself or work with a manufacturer to produce them. You manage your own inventory.
- Pros: Full control over product quality and branding, higher profit margins.
- Cons: Requires significant upfront investment, risk of unsold inventory, involves managing logistics and shipping.
What It Really Costs: A Realistic Budget Breakdown for Your First Year
One of the biggest questions for new founders is, “How much money do I actually need?” While Shopify helps keep costs low, it’s important to have a realistic budget. For a more comprehensive look at every potential expense, from transaction fees to marketing apps, be sure to read our complete guide on the real Shopify website cost.
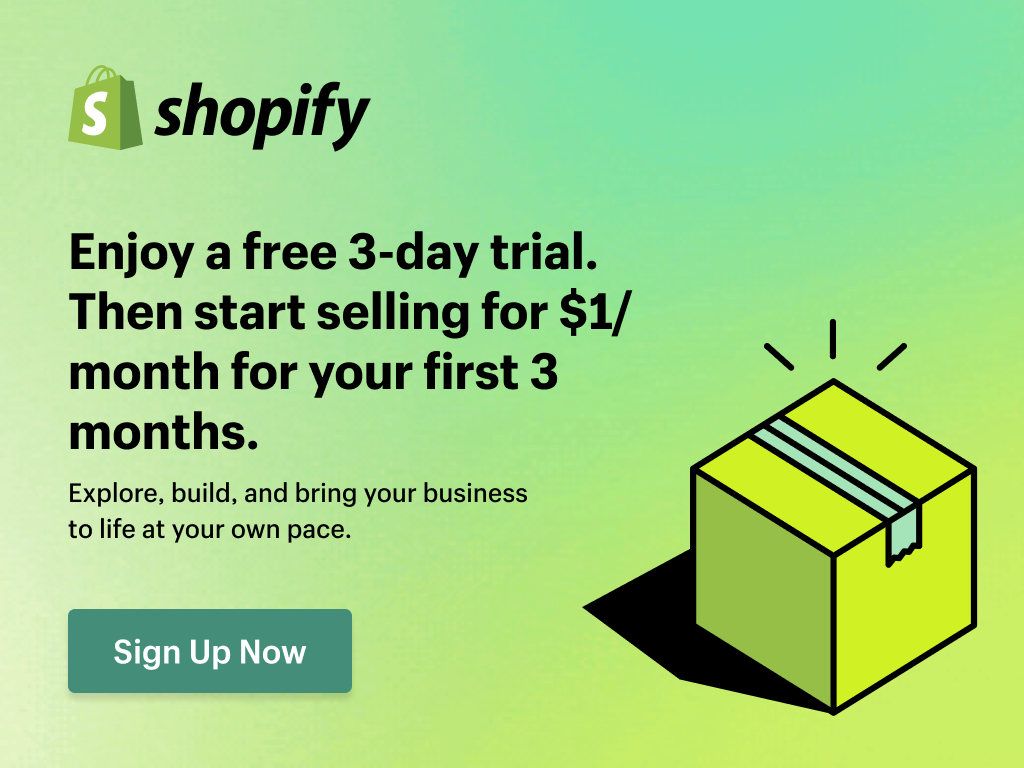
Remember to take advantage of our Shopify affiliate offer, which often allows you to get started for just $1/month for your first three months.

For now, here’s a high-level breakdown of potential costs for your first year.
| Cost Category | Low Estimate (Bootstrap) | High Estimate (Growth-Focused) | Description |
|---|---|---|---|
| Shopify Subscription | $348 | $948 | After the 3-month trial, this reflects the Shopify Basic plan (25/mo) vs the Grow plan (65/mo). |
| Domain Name | $15 | $20 | A custom .com domain name, typically purchased annually. |
| Theme | $0 | $350 | Using a professional free Shopify theme vs. purchasing a premium theme with more features. |
| Apps | $0 | $600 | Starting with free apps vs. adding paid apps for marketing, SEO, and reviews ($50/mo estimate). |
| Initial Marketing Budget | $100 | $1,500+ | A small budget for social media ads vs. a more robust launch campaign with influencer outreach. |
| Total Estimated First-Year Cost | ~$463 | ~$3,418+ | This range covers a lean, DIY launch versus a more aggressive, growth-oriented start. |
🛠️ Stage 2: The Build — Creating Your Shopify Store Step-by-Step
With your blueprint in hand, it’s time to bring your vision to life. This stage is all about the tactical work of building your store. We’ll go through each step, from signing up to setting up payments, with clear instructions to make the process feel less technical and more creative.
Step 1: Sign Up for Shopify and Choose Your Plan
First, click this link to start your free trial (special deal after the trial: $1 for 3 months).
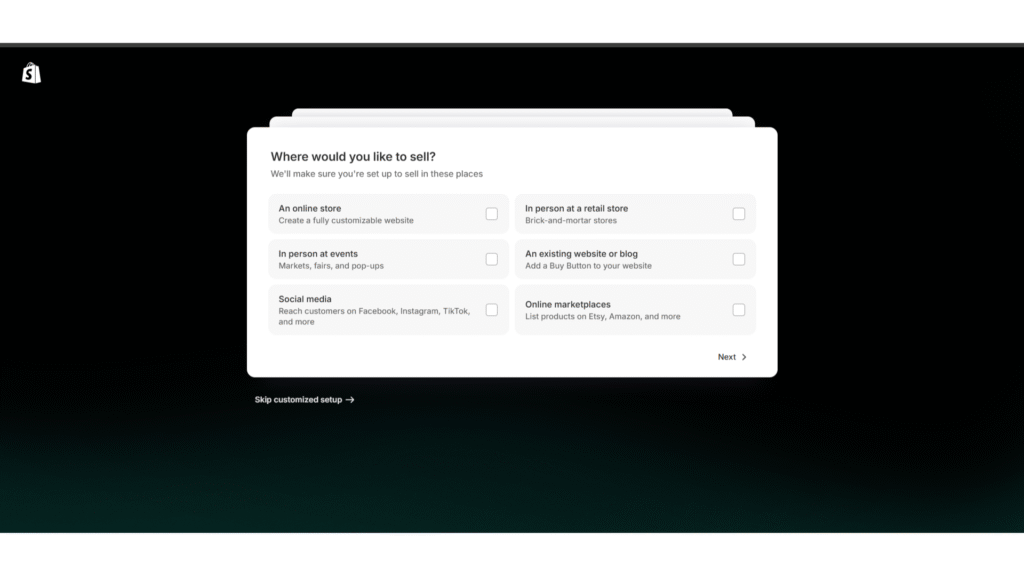
The sign-up process is a simple, guided questionnaire about your business idea and sales channels. Don’t worry about having all the answers perfectly—you can change them later.
Once you’re in, you’ll need to choose a subscription plan. For most new businesses, my advice is starting with the Shopify Basic plan. It gives you everything you need to launch and grow.
- Basic: Ideal for new businesses with occasional in-person sales.
- Grow: Best for growing businesses with one retail store.
- Advanced: Suited for scaling businesses that need advanced reporting.
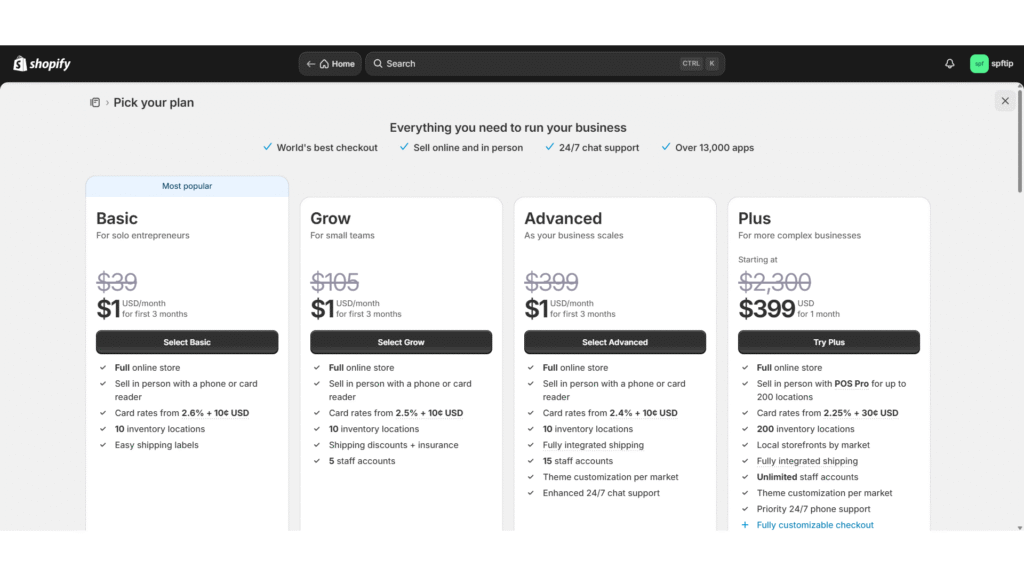
You can always upgrade your plan as your business grows, so there’s no risk in starting small.
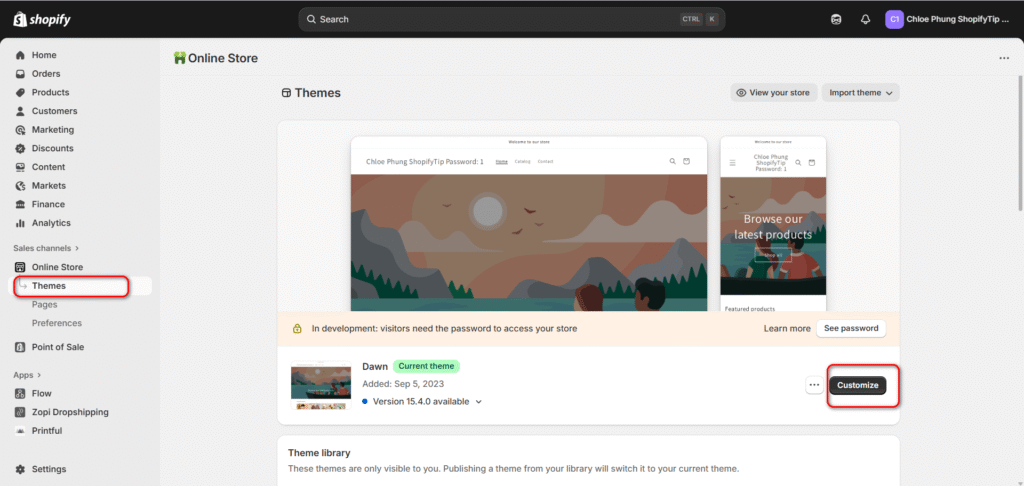
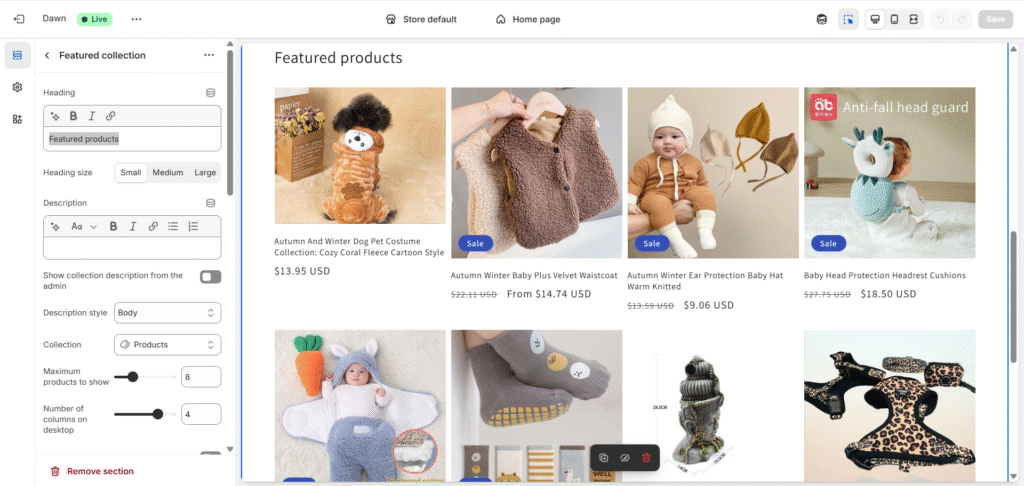
Step 2: Choose and Customize a Theme That Reflects Your Brand
Your theme is the visual foundation of your store. It controls the layout, look, and feel of your website. A great theme not only looks professional but is also fast, mobile-friendly, and easy for customers to navigate.
Under Online Store, click Themes > Customize.
💡A pro tip is to browse stores in your niche that you admire. If you find a design you love and want to see what makes it tick, you can use our Free Shopify theme & app detector to see exactly what theme and apps they’re using for inspiration.
You can find dozens of free and paid themes in the Shopify Theme Store. When choosing, consider these tips:
- Prioritize Speed and Simplicity: I’ve found that a clean, fast-loading theme provides a better user experience.
- Check Mobile Responsiveness: With over 70% of ecommerce traffic coming from mobile devices, your store must look perfect on a phone.
- Read the Reviews: See what other store owners are saying about the theme and the developer’s support.
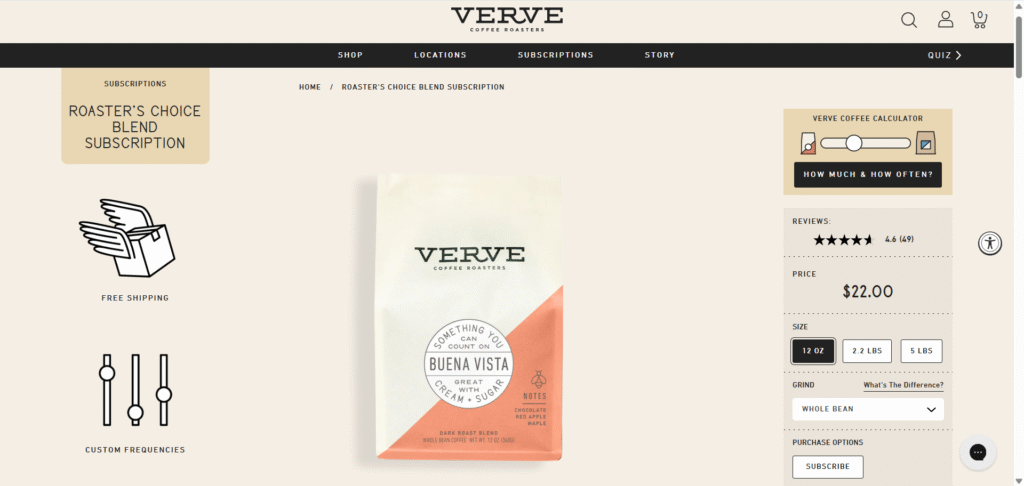
For a great example of branding through design, look at Verve Coffee Roasters. Their Shopify store uses a clean, image-rich theme that perfectly captures their modern, quality-focused brand identity.
To see a wider range of what’s possible, explore our analysis of the 50+ best Shopify store examples to find inspiration for your own brand.
Once you select a theme, you can use Shopify’s drag-and-drop editor to customize colors, fonts, and layouts to match your logo and brand style.
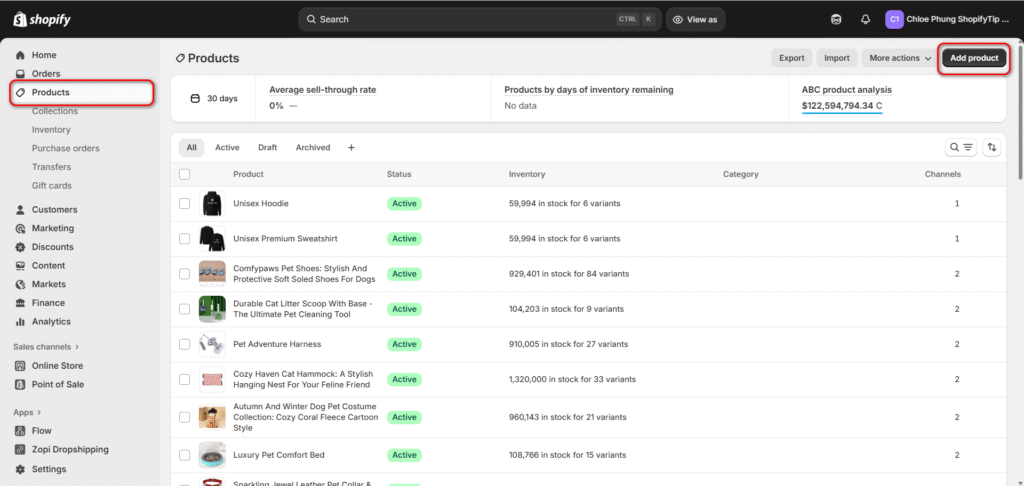
Step 3: Add Your Products and Write Descriptions That Sell
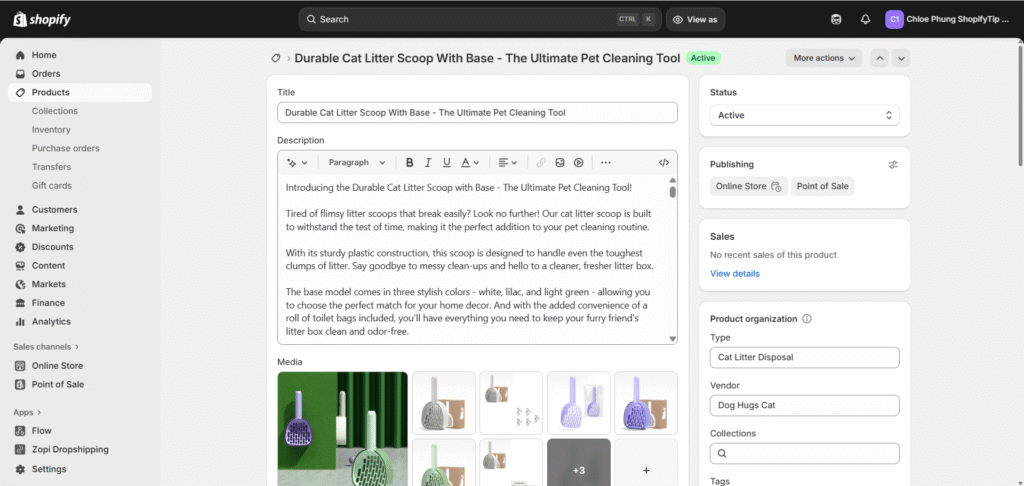
This is where your store starts to feel real. In your Shopify dashboard, navigate to “Products” and click “Add product.”
Fill out the essential fields:
- Title: Make it clear and descriptive.
- Media: Upload high-quality product photos, videos, or 3D models.
- Description: This is your sales pitch. I always suggest you focus on the benefits, not just the features.
- Pricing: Set your price, and use the “Compare-at price” to show a sale.
- Inventory: Track stock quantities to avoid overselling.
A persuasive product description connects with the customer’s needs. Instead of just listing specs, tell a story. Use this simple template to write descriptions that convert:
- Start with a relatable hook: Briefly describe the problem your product solves.
- Highlight key benefits: In a short paragraph, explain how it will improve the customer’s life.
- List essential features: Use bullet points for easy-to-scan details like materials, dimensions, and care instructions.
- Add a trust signal: Mention your quality guarantee or what makes your product special.
Step 4: Organize Products with Collections and Set Up Navigation
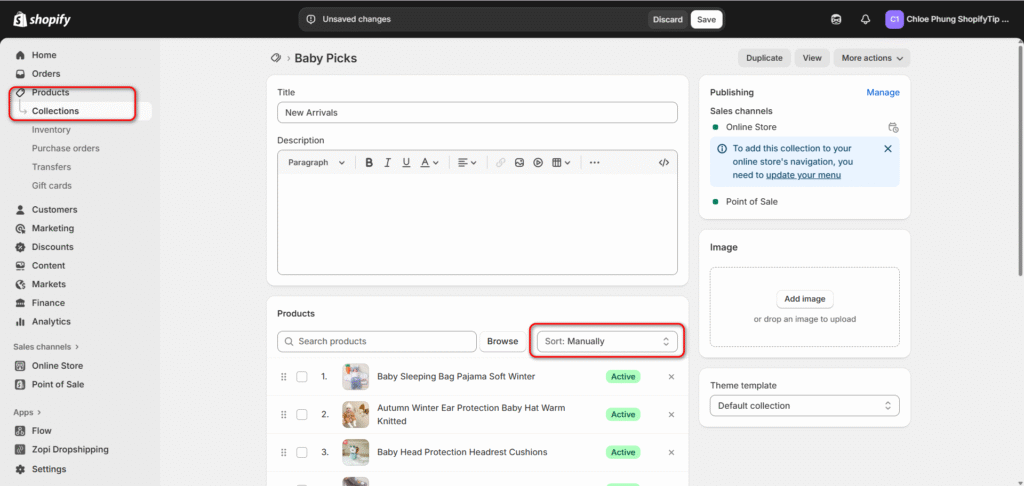
If you have more than a few products, you need to organize them. In Shopify, you do this with “Collections,” which are essentially product categories.
- Manual Collections: You hand-pick which products go into the collection. This is great for curated lists like “Staff Picks” or “New Arrivals.”
- Automated Collections: You set conditions to automatically add products. For example, you can create a collection for all t-shirts under $25 or for products with the tag “sale.”
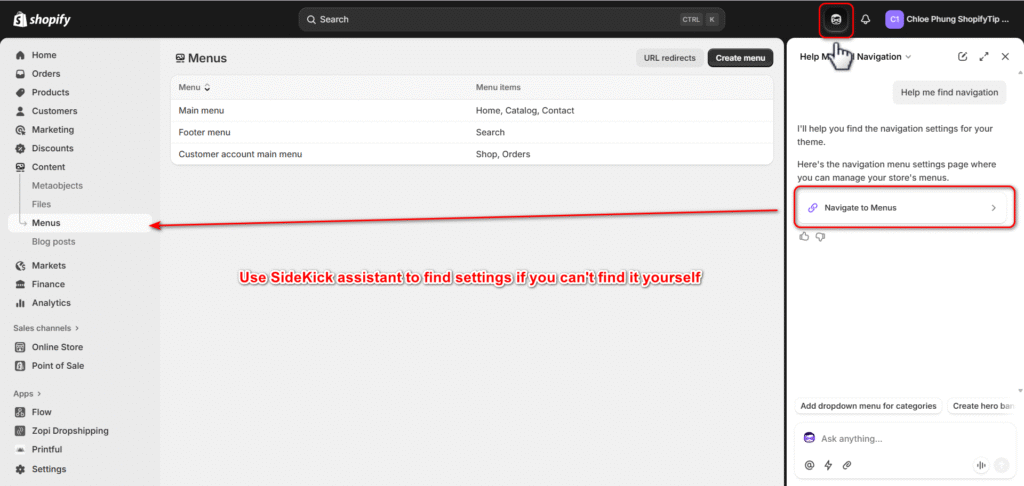
Once your collections are set up, create your store’s navigation menus under “Content” > “Menus”. Keep your main menu simple and intuitive (e.g., Home, Shop, About, Contact). Use the footer menu for links to your policy pages and FAQs.
💡Tip: Use SideKick assistant to find settings if you can’t find it yourself.
Step 5: Create Your Essential Pages (About, Contact, FAQ, Policies)
Beyond your product pages, customers look for key information to decide if they can trust your brand. These pages build credibility and answer common questions before they become a barrier to purchase.
- About Us Page: Tell your story. Why did you start this business? What makes your brand unique? This is your chance to connect with customers on a personal level.
- Contact Page: Make it easy for customers to get in touch. Include an email address, a contact form, and links to your social media profiles.
- FAQ Page: Proactively answer the most common questions about shipping, returns, product sizing, and more. This saves you time and builds customer confidence.
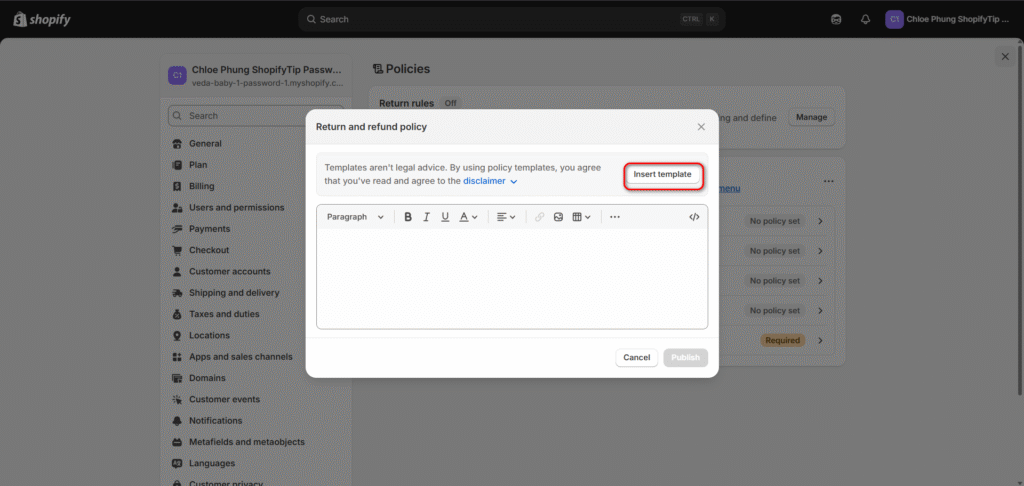
- Policy Pages: Shopify provides templates for your Refund Policy, Privacy Policy, and Terms of Service. These are essential for legal protection and transparency.
Under Online Store > Pages > Add page.

Step 6: Set Up Payments, Shipping, and Taxes
To get paid, you need to configure your payment gateway. In practice, the easiest way to do this is by activating Shopify Payments. It’s built-in, sets up instantly, and allows you to accept all major credit cards. You can also connect third-party providers like PayPal or Stripe.

Next, configure your shipping settings. Create “shipping zones” for the regions you deliver to (e.g., domestic, international).
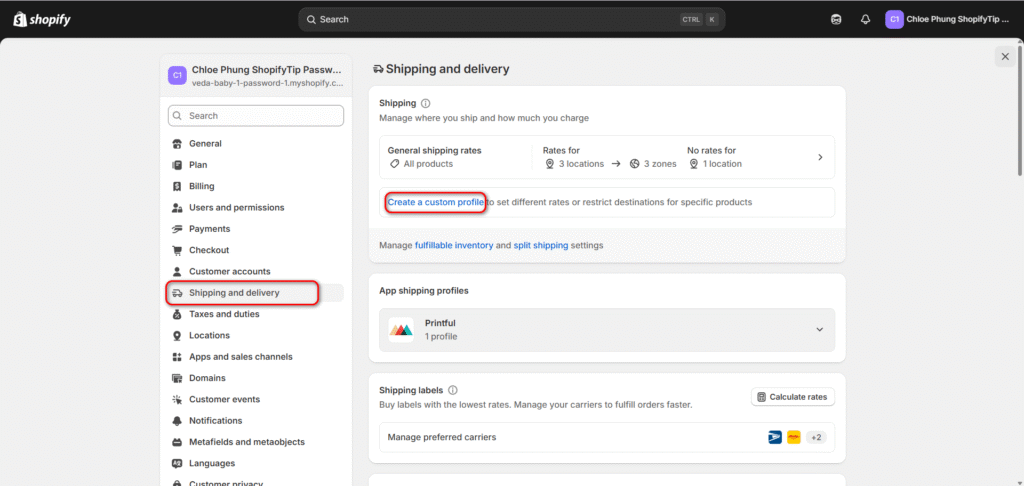
And choose your rates:
- Flat-Rate Shipping: Charge a single, fixed price for all orders.
- Free Shipping: A powerful marketing tool, often applied to orders over a certain value (e.g., “Free shipping on orders over $50”).
- Calculated Shipping: Rates are calculated in real-time by carriers like USPS or UPS based on package weight and destination.
For taxes, Shopify can automatically handle most calculations based on your location. However, it’s always wise to consult with a local tax professional to ensure you’re compliant.
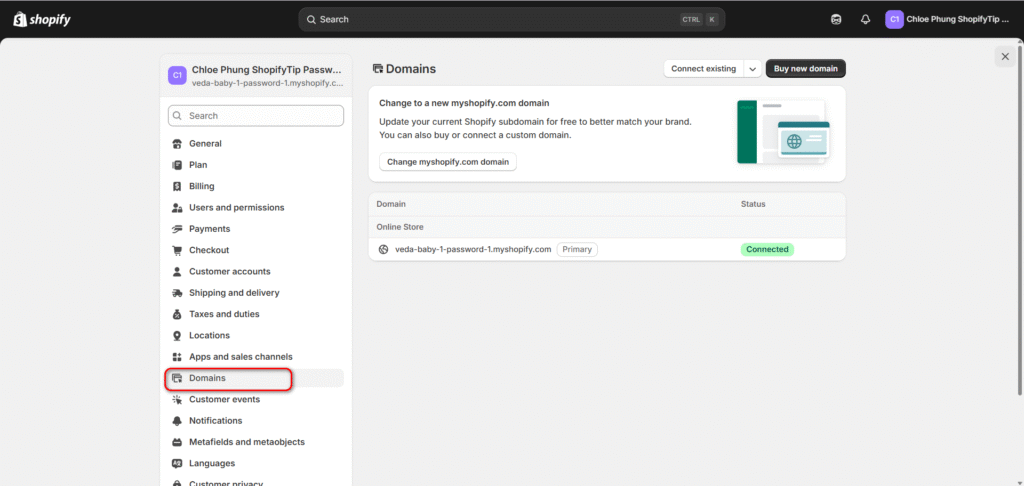
Step 7: Connect Your Domain and Prepare for Launch
The final step before launch is giving your store a professional address. You can buy a custom domain name (e.g., yourbrand.com) directly through Shopify or connect one you already own from a provider like GoDaddy or Namecheap.
Before you remove the password protection from your store, run through this quick pre-launch checklist:
- Place a test order using Shopify’s test credit card numbers to ensure the checkout process works smoothly.
- Click every link in your navigation and footer to check for broken links.
- Proofread your product descriptions and essential pages for typos.
- View your store on both a desktop and a mobile device to confirm the design is responsive.
Your store is now fully built and ready for customers. The next step is getting it in front of them. Make your store live and unlock Shopify’s powerful sales tools with a plan that works for you.
📈 Stage 3: The Boost — Your First 30 Days After Launch
Launching your store is a huge milestone, but it’s just the beginning. Your knowledge of how to start a Shopify business gets put to the test now.
The next 30 days are crucial for building momentum, getting your first sales, and learning what resonates with your customers. This section provides a clear, actionable playbook to guide you from launch day to consistent growth.
Your Shopify Launch Checklist: 10 Things to Double-Check Before You Go Live
Before you announce your store to the world, run through this final checklist. Trust me, catching a small issue now can prevent a major headache later.
- Place a test order: Use Shopify’s bogus gateway or a real payment gateway in test mode to simulate a full transaction, from checkout to fulfillment.
- Test your email notifications: Confirm that order confirmation emails are being sent and received correctly.
- Check all site links: Click every link in your main navigation, footer, and on your homepage to ensure they work.
- Proofread all content: Read your product descriptions, About page, and policies one last time to catch any typos.
- Optimize your images: Make sure all images have descriptive alt text for SEO and accessibility.
- Confirm shipping rates: Double-check that your shipping rates are appearing correctly for different locations and cart values.
- Review your mobile experience: Load your site on your phone and navigate it as a customer would. Is it fast and easy to use?
- Set up your analytics: Ensure Shopify Analytics is active and that you’ve connected Google Analytics if you plan to use it.
- Check your domain connection: Confirm that your custom domain is properly connected and secure (showing https).
- Remove password protection: In your Shopify admin, go to Online Store > Preferences and disable the password page. You’re live!
The First 30 Days: A Week-by-Week Marketing Playbook for Your First Sales
Don’t just launch and wait. A proactive marketing plan can help you get those critical first sales and build a foundation for future growth.
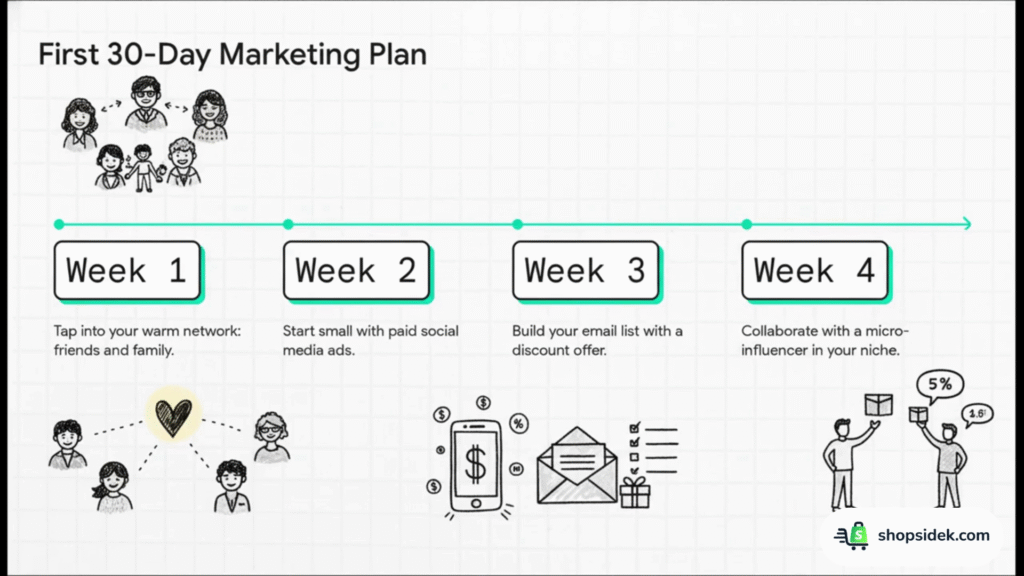
Week 1: Tap Into Your Warm Network
Your first customers are often the people who already know, like, and trust you. Announce your launch to friends and family and ask them to share it. Post the launch announcement across your personal social media profiles. The goal here isn’t just sales; it’s about generating initial social proof and feedback.
Week 2: Start with Paid Social Ads
Now it’s time to reach new customers. Set up a simple ad campaign on a platform where your target audience spends their time, like Facebook, Instagram, or TikTok. You don’t need a huge budget; start with $10-20 per day. Focus on a single, compelling product and target a specific audience. The goal is to drive your first clicks and learn which ad creatives get a response.
Week 3: Build Your Email List
An email list is one of your most valuable business assets. Add a simple pop-up or footer form to your store offering a small discount (like 10% off) in exchange for an email address. Use an app like Omnisend or Klaviyo to manage your list. Send a welcome email to new subscribers and begin building a direct line of communication with your most interested potential customers.
Week 4: Collaborate with a Micro-Influencer
Find a small influencer (1,000 to 10,000 followers) in your niche whose audience aligns with your brand. Reach out and offer to send them a free product in exchange for an honest post or story. This is a cost-effective way to get your brand in front of a targeted, engaged audience and build authentic social proof.
The New Store Starter Pack: 5 Essential (and Free) Shopify Apps
The Shopify App Store can be overwhelming. To get started, focus on a few key apps that solve critical needs for new stores. This “starter stack” provides essential functionality without adding costs, but it’s just the beginning. For a complete list of tools to enhance your store, be sure to check out our full guide to the 18 best free Shopify apps for new stores.
For Social Proof: Judge.me Product Reviews
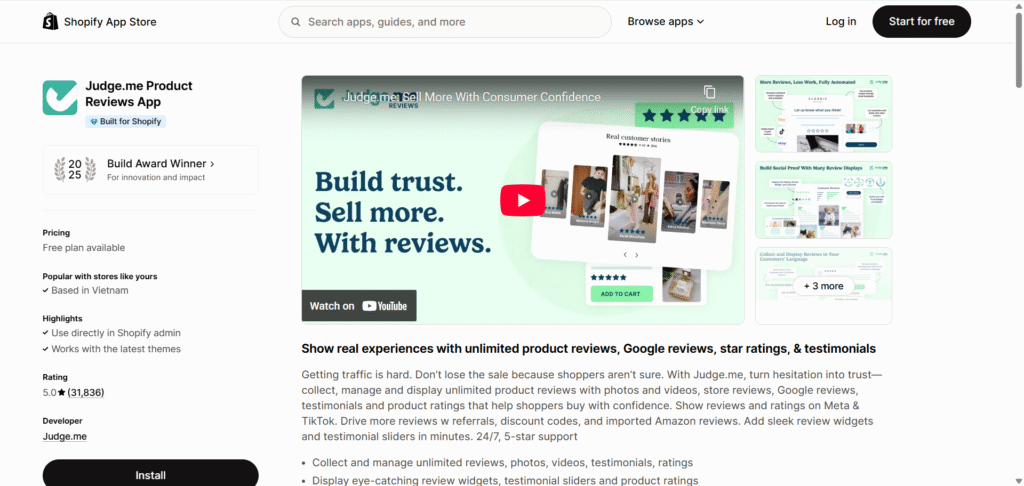
What it does: Lets you collect and display product reviews with text, photos, and videos.
Why you need it: Over 88% of shoppers trust online reviews as much as personal recommendations. Seeing reviews from other customers dramatically increases trust and conversion rates. Judge.me offers a generous free plan that is perfect for new stores.
For Email Marketing: Shopify Email
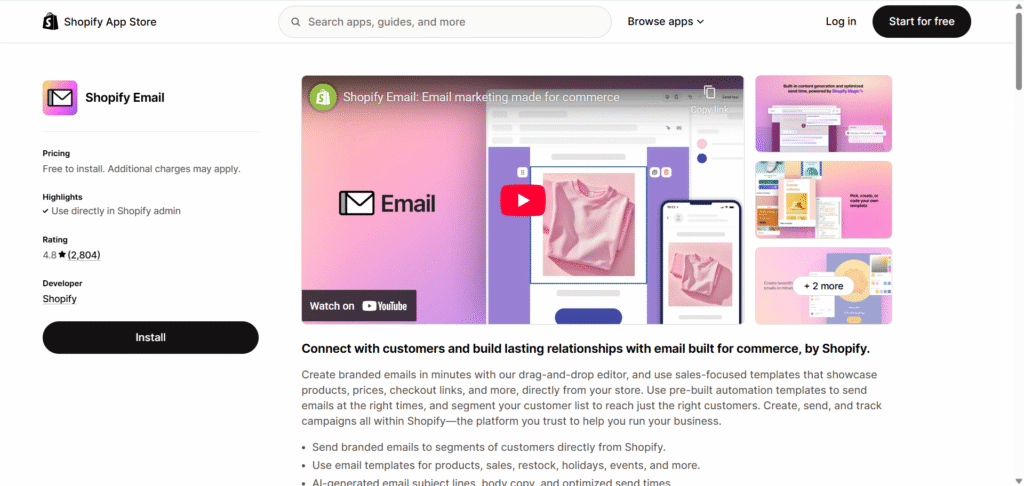
What it does: Shopify’s own email marketing tool that lets you send branded emails to your subscriber list directly from your admin dashboard.
Why you need it: It’s the simplest way to get started with email marketing. You can send up to 10,000 emails per month for free, making it ideal for sending welcome emails, new product announcements, and sale promotions.
For SEO: SEO Booster

What it does: Scans your site for SEO issues and helps you fix them with guided instructions. It helps with meta tags, image optimization, and checking for broken links.
Why you need it: Good SEO helps customers find your store through search engines like Google. This app makes the complex world of SEO more manageable for beginners.
For Customer Service: Shopify Inbox
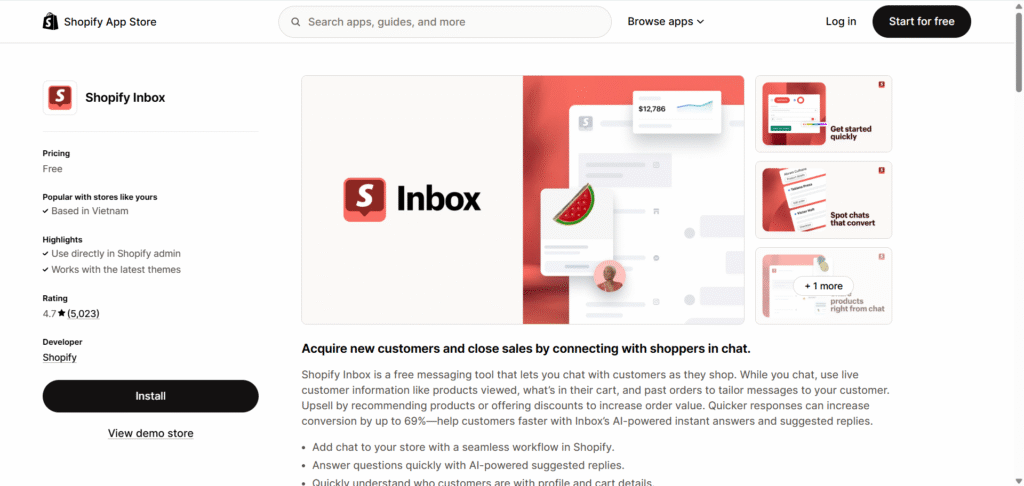
What it does: A free tool that lets you manage customer conversations from your website chat and social media in one place.
Why you need it: Being able to answer customer questions quickly via live chat can be the difference between a sale and an abandoned cart.
For Legal Policies: Shopify’s Free Policy Generators
What it does: While not an app, these are essential tools found in your settings. They generate templates for your Privacy Policy, Refund Policy, and Terms of Service.
Why you need it: These pages are legally necessary and build trust by showing customers your business is transparent and professional.
Common Hurdles for New Store Owners (And How to Solve Them)
Every entrepreneur hits roadblocks. The difference between a store that succeeds and one that stalls is the ability to diagnose and solve these common problems. This section addresses the challenges you’ll likely face after launch, providing actionable solutions to keep you moving forward.
🚨Problem: “My Only Sales Are from Friends and Family.”
Getting your first sales from your personal network is a fantastic start—it means your checkout works and you have support! But the real goal is to attract and convert strangers. When you’re ready to expand your reach, here’s what to do.
Solution 1: Engage in Niche Communities. Find where your target customers gather online. This could be a subreddit, a Facebook Group, or a niche forum. Don’t just join and spam your link. Become a valuable member by answering questions and participating in discussions. Once you’ve built credibility, you can naturally introduce your products as a solution.
Solution 2: Create a Lookalike Audience. If you’ve made a few sales, you have valuable data. On platforms like Facebook and Instagram, you can create a “lookalike audience” based on your existing customers. The platform will then show your ads to a new group of people who share similar characteristics and interests, dramatically improving your ad targeting.
🚨Problem: “I’m Getting Traffic but No Sales.”
I know this is one of the most common frustrations. It means your marketing is working—people are showing up—but something on your website is preventing them from making a purchase. This is a conversion rate issue, and you can usually fix it by auditing these three areas:

Solution 1: Clarify Your Shipping Costs. The number one reason for cart abandonment is unexpected costs at checkout. Be transparent with your shipping fees on your product pages and homepage. Better yet, offer a free shipping threshold (e.g., “Free Shipping on Orders Over $75”) to incentivize larger orders.
Solution 2: Add More Trust Signals. Shoppers are cautious. Without social proof, they might hesitate to buy. Add product reviews, display trust badges (like secure payment icons), and make sure your “About Us” page tells a compelling story. A professional, transparent site feels more trustworthy.
Solution 3: Improve Your Product Pages. Your product photos must be high-quality and show the item from multiple angles. Your descriptions need to be compelling and focus on the benefits for the customer. If your product page is weak, visitors will click away, no matter how much traffic you send to it.
🚨Problem: “I Don’t Know if My Marketing is Working.”
If you’re spending time or money on marketing, you need to know what’s effective and what’s not. You can’t improve what you don’t measure.
Solution 1: Use Your Shopify Analytics. Your Shopify dashboard is a goldmine of information. The most important report for beginners is “Sales by channel.” This report shows you exactly where your customers are coming from—whether it’s from a Google search, a Facebook ad, or an Instagram post. Focus your efforts on the channels that are already driving sales.
Solution 2: Set Up Google Analytics. For a deeper dive, connect your store to Google Analytics. While it can seem complex, it provides much more detailed insights into your customers’ behavior. You can track their entire journey: which pages they visit, how long they stay, and where they drop off. This helps you understand not just where traffic comes from, but what it does once it arrives.
Conclusion: Your Entrepreneurial Journey Starts Now
You now have the complete playbook for starting a Shopify business. We’ve moved from the strategic Blueprint of finding your niche and setting a budget, through the tactical Build of creating your store step-by-step, and into the crucial Boost phase to guide you through your first 30 days. The path from a simple idea to a live business is no longer a mystery.
The only thing separating you from your entrepreneurial goals is the first step. You have the map, you have the tools, and you have the knowledge to build something great. The journey of a thousand miles begins with a single click.
You have the complete blueprint for success. The only thing left to do is start. Click HERE to claim your free Shopify trial and launch the business you’ve been dreaming of today.
FAQs: How to Start a Shopify Business
Even with a complete playbook, a few practical questions often remain. This final section tackles the common logistical questions that might still be on your mind, providing clear, direct answers to build your confidence before you take the leap.
Do I need to be a designer or have coding skills to use Shopify?
Absolutely not. This is one of Shopify’s biggest strengths. The platform is built for everyone, not just tech experts.
You get access to a drag-and-drop website builder, professional pre-designed themes, and an intuitive admin panel that makes managing your store straightforward. You can create a beautiful, professional-looking store without writing a single line of code.
Can I sell on platforms like Instagram, TikTok, and Amazon with Shopify?
Yes, and this is a key feature for growth. Shopify integrates directly with major social media and marketplace channels. You can add sales channels like Facebook, Instagram, TikTok, and even Amazon or Etsy directly from your dashboard.
This allows you to list your products where your customers already spend their time and manage all your inventory and sales from one central Shopify hub, creating a true multi-channel business with ease.
How does Shopify handle payments and how do I get paid?
Shopify makes this incredibly simple with its built-in processor, Shopify Payments. When you set it up, you can instantly accept all major credit cards, as well as popular digital wallets like Apple Pay and Google Pay.
When a customer makes a purchase, the funds are processed securely and then transferred directly to your business bank account on a schedule you set (e.g., daily or weekly). This process avoids the common hassle of setting up a complex third-party merchant account.
What happens after my free trial ends? Do I have to commit?
When your trial period is over, you will be prompted to choose a paid monthly plan to launch your store publicly and start selling. The most common starting point for new businesses is the Basic plan. If you decide during the trial that Shopify isn’t right for you, you can simply close your account without any obligation.
The trial is genuinely risk-free and designed to give you ample time to build your store and decide if it’s the right fit for your business. There are no long-term contracts, and you can cancel or change your plan at any time.