Making the leap from WordPress to Shopify is a powerful move for any growing eCommerce brand. It’s a step toward better security, streamlined operations, and a platform built exclusively for selling. But it’s a move that often comes with a list of legitimate fears.
Will my product data and order history transfer correctly? What happens to my hard-won SEO rankings? How do I avoid costly downtime?
You’ve come to the right place. This guide is your complete, step-by-step playbook for a successful WordPress to Shopify migration. We’ll walk you through every stage of the process, from initial planning and data export to your final post-launch checks.
Our goal is to demystify the process, eliminate the risks, and ensure your transition is smooth, secure, and seamless. Consider this your definitive resource for making the move in 2026.
If you’re a visual learner, I’ve also created an explainer video on WordPress to Shopify migration.
Why Smart Brands Move to Shopify (And When You Shouldn’t)
For many businesses, the decision to move from WordPress to Shopify is a strategic pivot from managing a website to growing a commerce empire.
While WordPress offers incredible flexibility, that freedom comes with the responsibility of ongoing maintenance, security patches, and performance optimization. Shopify, in contrast, provides a purpose-built, high-performance ecosystem designed for one thing: selling.
If you want to dive deep into the specific differences, our data-backed guide to WooCommerce vs. Shopify is the best place to start.
For a quick overview, here’s a breakdown of the core differences:
| Feature | WordPress (with WooCommerce) | Shopify |
| Maintenance | User-Managed: You are responsible for all updates, including plugins, themes, and security patches. | Fully Hosted: Shopify manages all technical updates, security, and performance optimizations for you. |
| Security | Self-Managed: Requires security plugins and constant vigilance to stay protected and PCI compliant. | Built-In: Level 1 PCI DSS compliant out of the box, with a dedicated team managing security. |
| Scalability | Depends on Hosting: Can handle high traffic, but requires expensive, optimized hosting solutions. | Engineered for Growth: Built to handle massive traffic spikes (like Black Friday sales) without issue. |
| Total Cost | Variable & Hidden: Free core software, but costs for hosting, premium plugins, and developer time add up. | Predictable: Clear monthly subscription fee that includes hosting, security, and support. |
So, when should you stick with WordPress?
To be clear, Shopify isn’t for everyone. If your website is primarily a blog, a portfolio, or a publication where eCommerce is a minor add-on rather than the core business, WordPress is often the better choice. Its content management capabilities are world-class. The migration makes sense when your primary goal shifts from publishing content to driving sales.
Your Pre-Migration Blueprint: 6 Steps to Prevent Disaster
A successful migration is 90% planning and 10% execution. Rushing into the data transfer process without a clear plan is the number one cause of errors, data loss, and SEO damage. This pre-migration blueprint is your essential checklist to ensure a smooth and predictable WordPress to Shopify migration.
Step 1: Back Up Your Entire WordPress Site
Before you do anything else, create a complete backup of your WordPress site. This is your non-negotiable safety net. If anything goes wrong during the export process, you’ll have a full, restorable version of your store.
Many hosting providers offer one-click backup solutions. For extra peace of mind, use a trusted plugin like UpdraftPlus or All-in-One WP Migration to create and download a separate backup file that you control.
Step 2: Set Up Your Shopify Trial Account
Your Shopify trial account is the perfect sandbox for your migration. It’s a live, fully-functional store where you can import data, customize your theme, and configure settings without affecting your current live WordPress site.
To help you save on setup costs, you can sign up via this link to get a free trial and pay just $1/month for the first 3 months.

(Note: I’m a Shopify Media Partner, so I might earn a small commission if you use my link. It doesn’t cost you anything extra and helps keep this blog running).
This extended trial allows you to work on your new store in the background and only make it public when you’re 100% ready.
Step 3: Conduct a Content & Plugin Audit
This is the perfect opportunity for some spring cleaning. Not everything on your old site might be necessary for your new one. Review your pages, blog posts, and product data. Decide what is essential to move and what can be left behind.
Most importantly, make a list of all the WordPress plugins you currently use to power your store’s functionality—think SEO tools, contact forms, subscription managers, and review widgets. You will need to find Shopify app equivalents for these, a topic we cover in-depth later in our Plugin Replacement Cheatsheet.
Step 4: Perform a URL & SEO Baseline Audit
Losing your search engine rankings is a major concern during any migration. To prevent this, you need a map of your existing URLs. Export a complete list of your website’s URLs, especially your top-performing product and blog pages. You can get this data from Google Analytics or use an SEO tool to crawl your site. This list will be critical for setting up 301 redirects later, which tells Google where to find your content at its new address.
Step 5: Budget Your Move: A Realistic Cost Breakdown
Understanding the total financial picture upfront prevents surprises. The migration itself has variable one-time costs, but it’s just as important to plan for ongoing operational expenses. To learn more, see our complete guide on the real Shopify website cost.
Here’s a look at what to expect for the migration itself:
| Migration Path | Estimated One-Time Cost | Best For |
| Automated App | $50 – $250+ | Most stores; a balance of cost, speed, and accuracy. |
| Manual (CSV) | Free | Small stores with simple product catalogs. |
| Migration Agency | $500 – $5,000+ | Large, complex stores or businesses that prefer an expert. |
Step 6: Schedule Your Migration to Minimize Downtime
The final step of the migration is pointing your domain from your old WordPress host to your new Shopify store. While this is typically fast, it’s wise to schedule the “go-live” moment during your slowest traffic period. For most businesses, this means late at night or over a weekend. This minimizes any potential disruption for your customers.
The Core Migration: Choose Your Path (Automated vs. Manual)
This is the heart of your WordPress to Shopify migration: moving your data. There are two primary ways to transfer your products, customers, and orders from WordPress to Shopify. Your choice will depend on your budget, technical confidence, and the complexity of your store. We’ll walk you through both.
Path A: The Automated Method (Recommended for 99% of Stores)
For the vast majority of businesses, using an automated migration app is the safest, fastest, and most reliable method. These tools are designed to act as a bridge between WordPress and Shopify, accurately transferring your data with minimal manual effort. They handle the complex mapping of data fields behind the scenes, dramatically reducing the risk of human error.
For a reliable and fast migration, we recommend a tool like LitExtension or Cart2Cart. They automate the entire process, minimizing risk and saving hours of work. You can run a free demo migration to see it in action before committing.
Here’s how the process generally works:
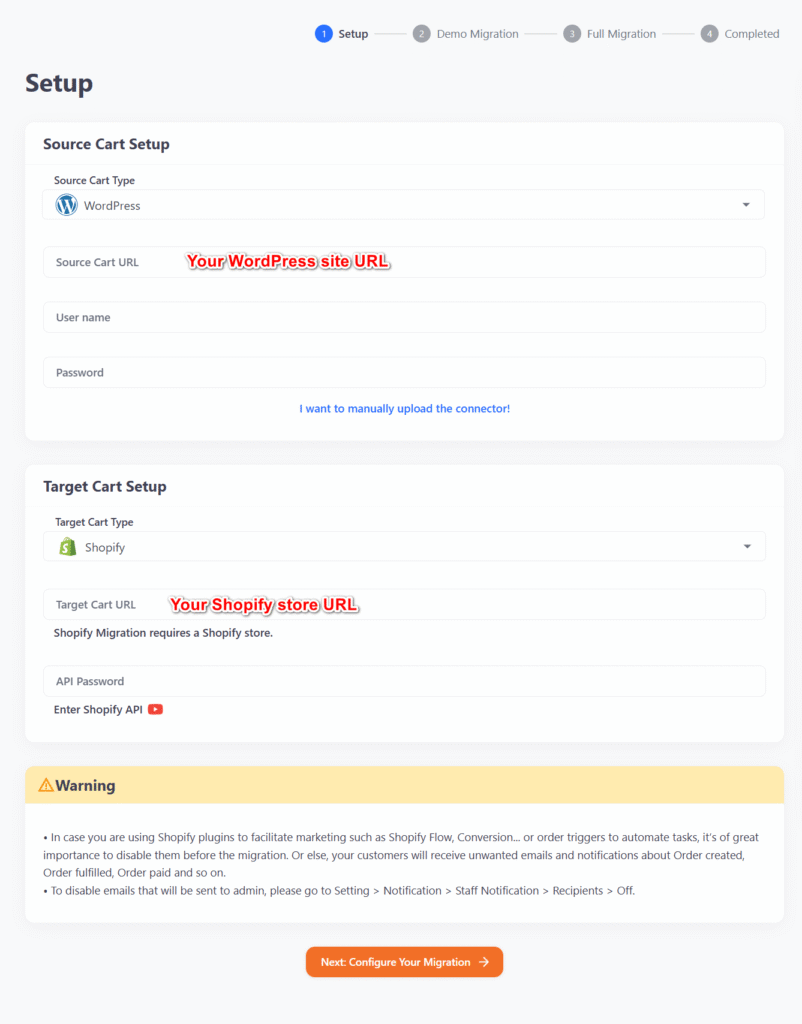
Step 1: Connect Your WordPress and Shopify Stores
First, you’ll provide the tool with your source (WordPress) and target (Shopify) store details. This usually involves entering your WordPress site’s URL and then connecting your Shopify account, often by installing a small connector app that grants secure access.
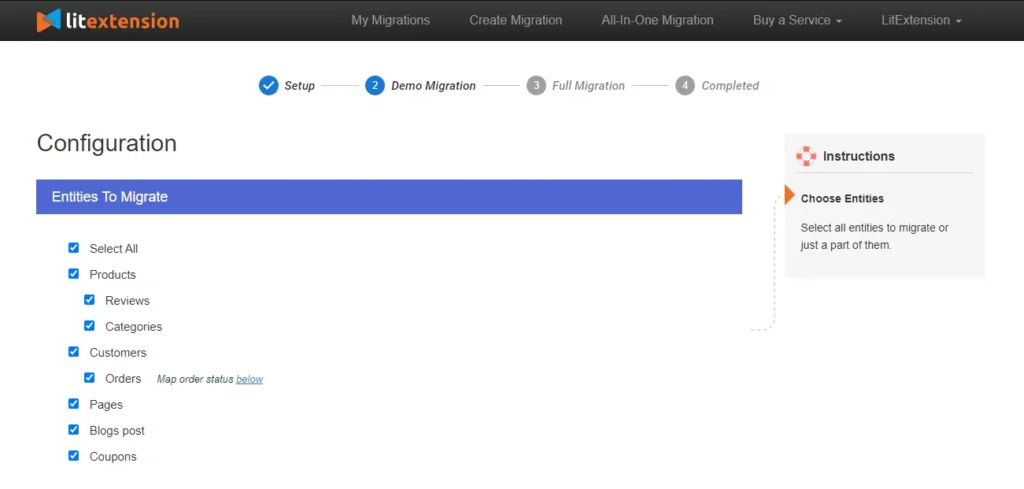
Step 2: Select the Data You Want to Migrate
This is where the power of an automated tool shines. You’ll be presented with a checklist of all the data types you can move. You can select everything or just specific items. Common options include:
- Products (including images, variants, categories, and SEO data)
- Customers (with shipping and billing addresses)
- Order History (including items, customer info, and notes)
- Blog Posts and Pages
- Coupons and Discounts
Step 3: Run a Free Demo Migration
Every reputable migration service offers a free demo. This crucial step transfers a small number of your products, customers, and orders (usually 10-20 of each) to your Shopify trial store. It allows you to verify that the data is appearing correctly before you commit to the full migration. This is an essential confidence-building check.
Step 4: Launch the Full Migration
Once you’ve confirmed the demo looks good, you can proceed with the full migration. Simply click the start button, and the service will begin transferring all your selected data in the background. The process runs on their servers, so you don’t even need to keep your browser open. You’ll receive an email notification when it’s complete.
Path B: The Free Manual Method (Using CSV Files)
If you have a very small store (fewer than 50 products), are comfortable working with spreadsheets, and are on a tight budget, a manual migration using CSV (comma-separated values) files is a viable option.
Important Limitations: This method is best for products and customers only. Manually migrating order history is notoriously difficult and generally not recommended due to the complexity of the data. This path requires careful attention to detail, as any formatting errors in your CSV file can cause the import to fail.
Step 1: Export Products from WooCommerce
In your WordPress dashboard, navigate to Products → All Products. At the top of the page, click the Export button.
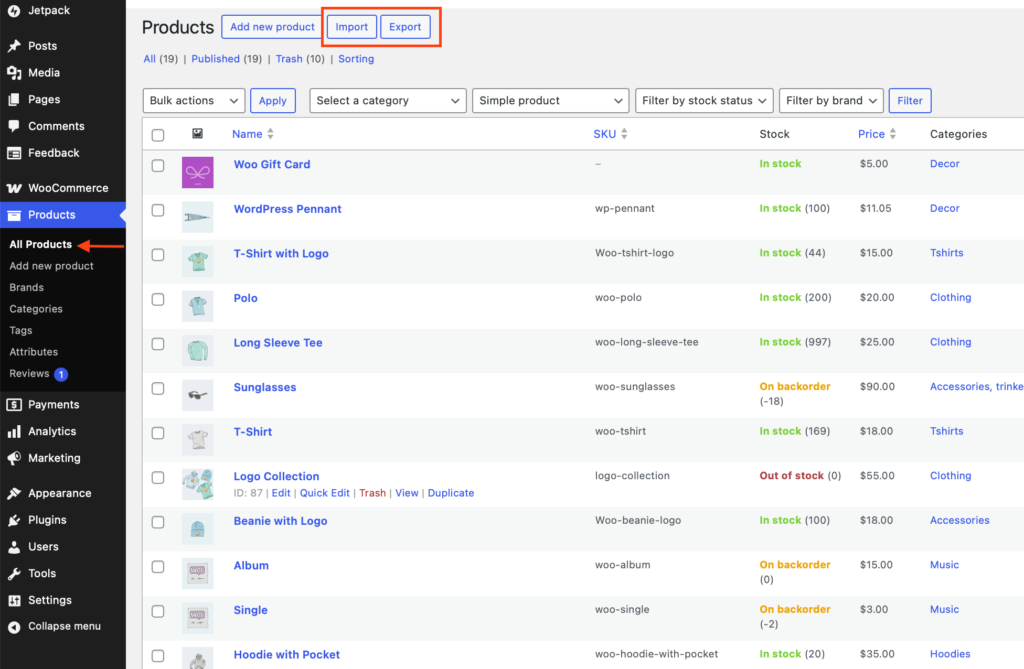
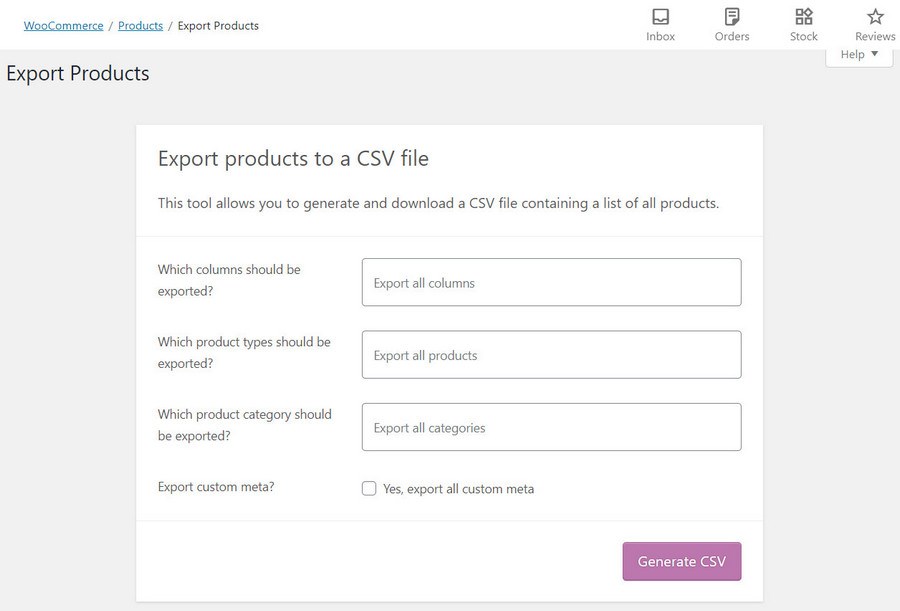
You’ll be given options to select which columns and product types to export. For a complete transfer, it’s best to leave all columns and product types selected. Download the generated CSV file.
Step 2: Modify the CSV File for Shopify
This is the most critical and error-prone step. Shopify has a strict CSV file format, and the file exported from WooCommerce will not work without modification. You’ll need to open the file in a spreadsheet program (like Google Sheets or Microsoft Excel) and edit the column headers.
The most important change is renaming the product name column. WooCommerce exports it as Name, but Shopify requires it to be Title. You must make this change for the file to be recognized. You will need to review Shopify’s official Product CSV documentation to ensure all other columns are mapped correctly.
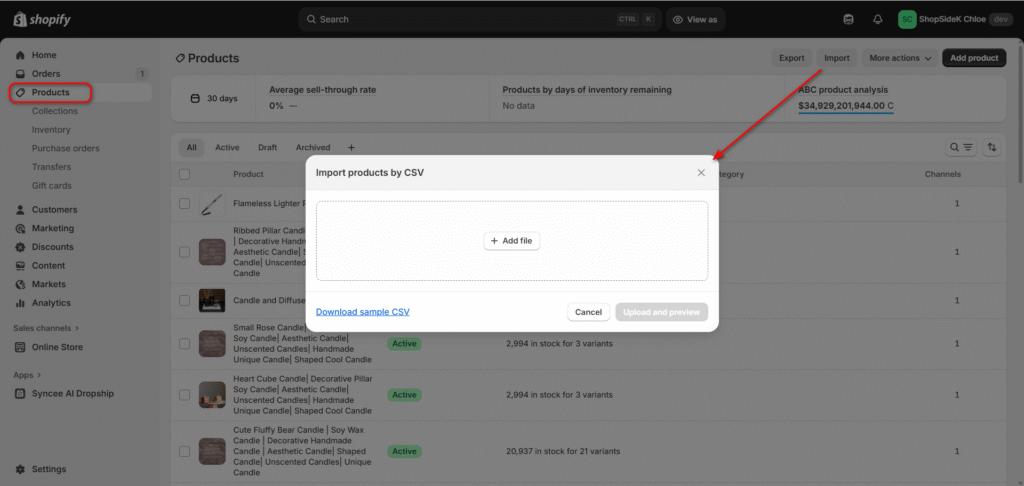
Step 3: Import Products into Shopify
In your Shopify admin, go to Products and click the Import button. Upload your modified CSV file. Shopify will show you a preview of how it interprets the data. Review this carefully to make sure products, prices, and variants look correct before starting the import.
Step 4: Repeat the Process for Customers
You can follow a similar process for your customer data. Export your customer list from WordPress/WooCommerce, carefully modify the CSV column headers to match Shopify’s required format. And then import it into the Customers section of your Shopify admin.
The Asset: 20+ WordPress Plugins and Their Shopify App Replacements
One of the biggest hurdles in moving from WordPress is figuring out how to replicate the functionality you rely on from your favorite plugins. In the Shopify ecosystem, this functionality is handled by apps. While the names are different, you can almost always find a powerful, well-supported Shopify app to replace any WordPress plugin.
Based on our analysis of dozens of successful migrations, we’ve created this cheatsheet to map some of the most popular WordPress plugins to their top-rated Shopify app equivalents.
| Functionality | Common WordPress Plugin | Recommended Shopify App(s) |
| Search Engine Optimization | Yoast SEO, Rank Math | Shopify’s built-in SEO features + apps like Yoast SEO or Plug in SEO. |
| Subscriptions | WooCommerce Subscriptions | Recharge, Bold Subscriptions, Skio |
| Contact & Custom Forms | Contact Form 7, WPForms | Shopify’s built-in form, Formidable Forms, Judge.me’s Form Builder |
| Product Reviews | WooCommerce Product Reviews | Judge.me, Loox, Yotpo |
| Page Builder | Elementor, Divi | Shopify’s native editor + PageFly, Ecomposer |
| Email Marketing | Mailchimp for WooCommerce | Shopify Email, Klaviyo, Omnisend |
| Affiliate Programs | AffiliateWP | UpPromote, Refersion |
| Backups | UpdraftPlus, All-in-One WP | Shopify handles server backups; use Rewind for account-level data. |
Don’t lose your store’s functionality.
Download our free, expanded cheatsheet of 20+ WordPress plugins and their best Shopify app replacements to ensure a seamless transition.
The Post-Migration Go-Live Sequence: Your 8-Step Launch Plan
Your data has arrived, but your new store isn’t quite ready for customers. This final sequence ensures your store is fully functional, your SEO is protected, and your launch is a success.
This is where you transition from a technical migration to building a thriving business—what we call the Build and Boost stages. For a complete strategic guide on this process, see our article on how to start a successful Shopify business.
The following steps will transform your migrated data into a live, professional, and profitable store. Don’t skip them.
Step 1: Verify and Organize Your Imported Data
First, conduct a manual spot-check to ensure your data migrated as expected. Take it from me, don’t assume everything is perfect. Review a handful of products to confirm images, variants, and prices are correct. Check a few customer profiles to see if their address information transferred properly.
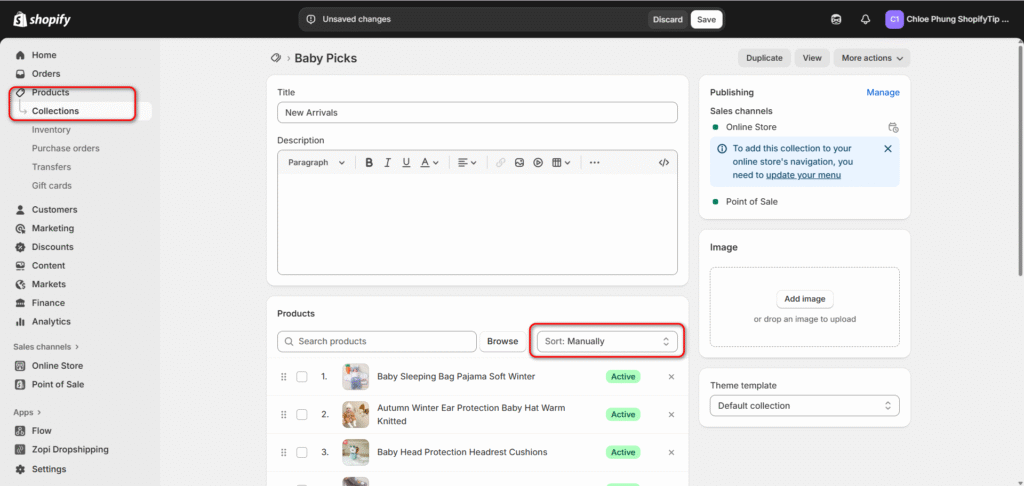
Once you’re confident in the data, begin organizing it using Shopify’s structure. As the Shopify Help Center guides, this is the time to create product collections (Shopify’s version of categories) to make it easy for customers to browse your catalog. Grouping products into collections like “New Arrivals” or “Best Sellers” is a fundamental step in building a user-friendly storefront.
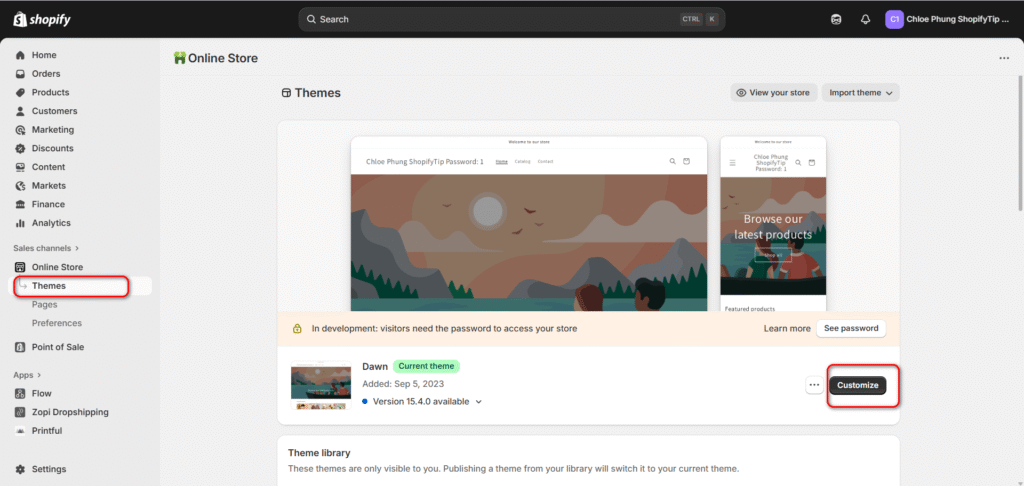
Step 2: Customize Your Shopify Theme
Now, bring your brand to life. In the Shopify admin, navigate to Online Store → Themes to select and customize your design.
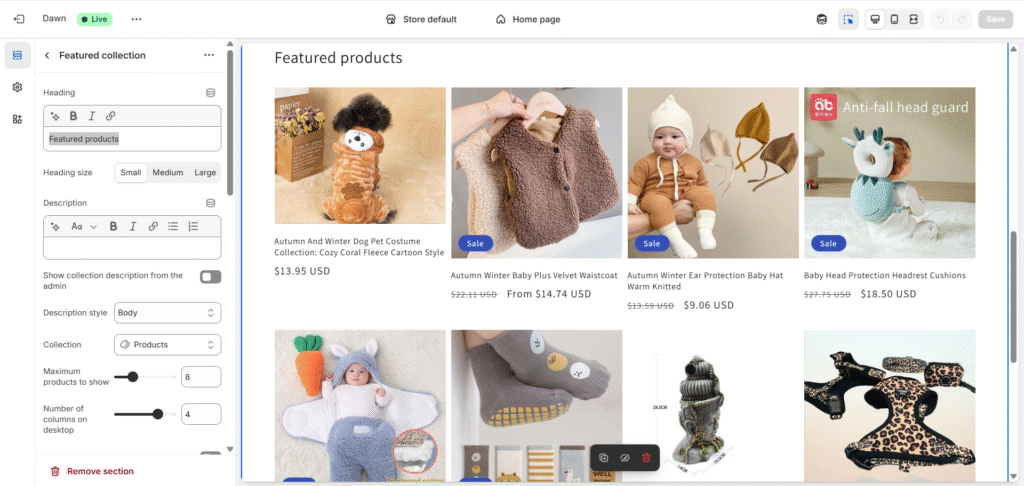
This is where you’ll upload your logo, set your brand colors and fonts, and arrange the layout of your homepage.
Build out essential pages like your “About Us,” “Contact,” and “FAQ” pages to build trust with shoppers. Under Online Store > Click Pages > Add page.

Your goal is to make the new site feel familiar to your existing customers while taking advantage of Shopify’s modern design features.
Step 3: Configure Shipping, Taxes, and Payments
Before you can make a sale, you need to handle the business essentials.
- Shipping: Set up your shipping zones, define your rates (e.g., free shipping, flat rates, or calculated rates), and add your package sizes.
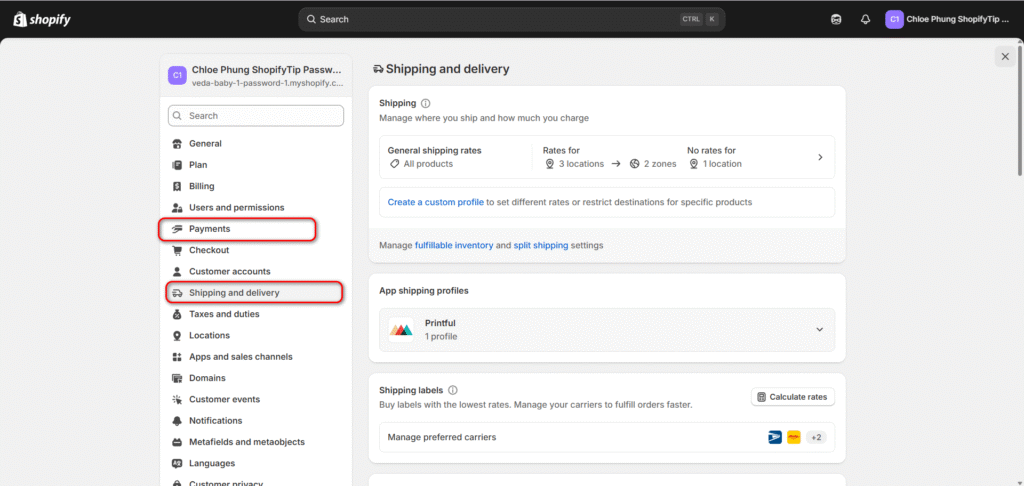
- Taxes: Configure Shopify to automatically collect sales tax. Shopify uses up-to-date tax rates, but you’ll need to tell it which states or countries you have a responsibility to collect tax in.
- Payments: Activate Shopify Payments to accept credit cards, or connect your preferred third-party payment provider like PayPal or Stripe.

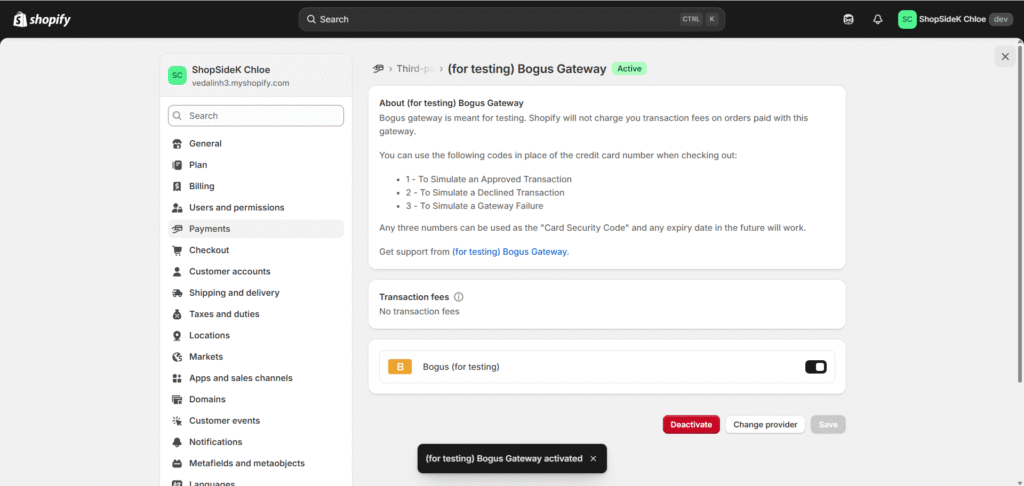
Step 4: Run a Test Order with Shopify’s Bogus Gateway
This is a critical step that many merchants skip. Before you process a real customer’s money, you must test your entire checkout flow. Shopify provides a fantastic tool for this called the “(for testing) Bogus Gateway.”
Here’s how to use it:
- Go to Settings → Payments and deactivate any active credit card gateway.
- Select Add payment methods, click the Search by provider tab, and select (for testing) Bogus Gateway.
- Go to your live storefront, add a product to your cart, and proceed through the entire checkout process.
- When asked for payment, use the number 1 for the credit card field, any name, a future date, and 123 for the security code.
- Confirm the order goes through successfully and appears in your Orders admin. This test verifies that your shipping, tax, and notification settings are all working correctly.
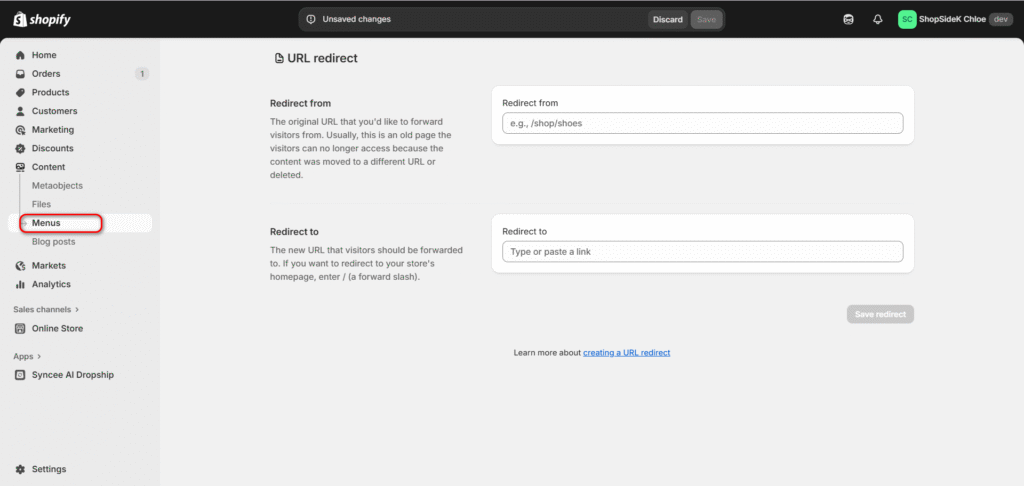
Step 5: Set Up Your Domain and Implement 301 Redirects
In my opinion, this is the most important step for preserving your SEO. First, point your domain to Shopify by updating your DNS records with your domain registrar.
Next, you must implement 301 redirects. Your WordPress URL structure (e.g., yourstore.com/category/product-name) might be different from Shopify’s (e.g., yourstore.com/products/product-name). A 301 redirect is a permanent signpost that tells search engines and users where the old page has moved.
Using the URL list you created in the pre-migration blueprint, go to Content → Menus → URL Redirects in Shopify and create a redirect for every important old link to its new Shopify equivalent.
Step 6: Submit Your New Sitemap to Google Search Console
Once your domain is live on Shopify, you must formally notify Google about the changes to your site. The correct procedure depends on whether you are keeping your existing domain name.
Scenario A: You are KEEPING the same domain (e.g., yourstore.com remains yourstore.com)
This is the most common scenario. Your main task is to tell Google to crawl your new site structure.
- Submit Your New Sitemap: Shopify automatically generates a sitemap for you at yourstore.com/sitemap.xml
- Log in to your Google Search Console account for that domain.
- Navigate to the Sitemaps section and submit the new sitemap URL. This, combined with the 301 redirects you set up in the previous step, encourages Google to index your new store structure quickly and understand the changes.

Scenario B: You are CHANGING your domain name (e.g., moving from yourblog.com to yournewstore.com)
If your migration includes a new domain, you have a critical extra step.
- Use the Change of Address Tool: In Google Search Console, you must use the Change of Address tool. This is the official way to tell Google your entire site has permanently moved. It is the most powerful signal you can send to ensure Google transfers your SEO equity and rankings to the new domain.
- To use this tool, you must have both your old and new domains verified as separate properties in your Google Search Console account. Once verified, select your old domain, go to Settings → Change of Address, and follow the on-screen instructions to point Google to your new domain.
- After using the tool, you should still submit your new sitemap to the GSC property for your new domain.
Step 7: Install Key Shopify Apps
Refer back to your plugin audit list and our Plugin Replacement Cheatsheet. Now is the time to install and configure the Shopify apps that will replicate your old store’s functionality. This could include your email marketing platform (like Klaviyo), your product review app (like Judge.me), and any advanced SEO or form-building tools.
Step 8: Go Live and Announce Your New Store
The final step is to remove the password protection from your Shopify store, making it fully public. You can find this setting under Online Store → Preferences.

With your new store live, it’s time to celebrate! Announce the launch to your email list and social media followers. Highlight the improved shopping experience and welcome them to your new and improved online home.
Frequently Asked Questions (FAQ)
Will I lose my SEO rankings when I migrate?
You will not lose your SEO rankings if the migration is handled correctly. The single most important factor is to meticulously implement 301 redirects from your old WordPress URLs to your new Shopify URLs. This tells search engines where each page has moved, allowing them to transfer the ranking value.
Once you’ve safely protected your existing authority, the next step is to grow it. For a practical guide on this, check out our beginner’s case study on how to get a Shopify page on the front page of Google.
How long does a WordPress to Shopify migration take?
The actual data transfer can be surprisingly fast. With an automated tool, moving thousands of products, customers, and orders often takes just a few hours. However, the entire project—including planning, theme customization, app configuration, and testing—can take anywhere from a few days to a few weeks to complete thoroughly before you’re ready to go live.
Can I migrate my blog posts from WordPress to Shopify?
Yes, you can absolutely migrate your blog posts. Most automated migration apps include blog content as a standard option. You can also use specialized apps like Matrixify for more complex blog migrations that involve custom fields or a large number of images. It’s a very common and manageable part of the process.
Conclusion: Your Next Steps
Moving from WordPress to Shopify is a significant and strategic upgrade for your business. As we’ve covered, a successful transition isn’t about luck; it’s about following a proven playbook. By starting with a careful pre-migration blueprint, choosing the right data transfer method for your needs, and executing a detailed post-launch checklist, you can eliminate the risks and ensure a seamless switch.
For the vast majority of stores, leveraging an automated tool is the safest and fastest path forward, protecting your valuable data, SEO, and peace of mind. The process is more manageable than you think, and the rewards of a more powerful, secure, and scalable eCommerce platform are well worth the effort.
Ready to make the move? The best way to start is by exploring the platform yourself. Claim your free Shopify trial and begin building your new store today.