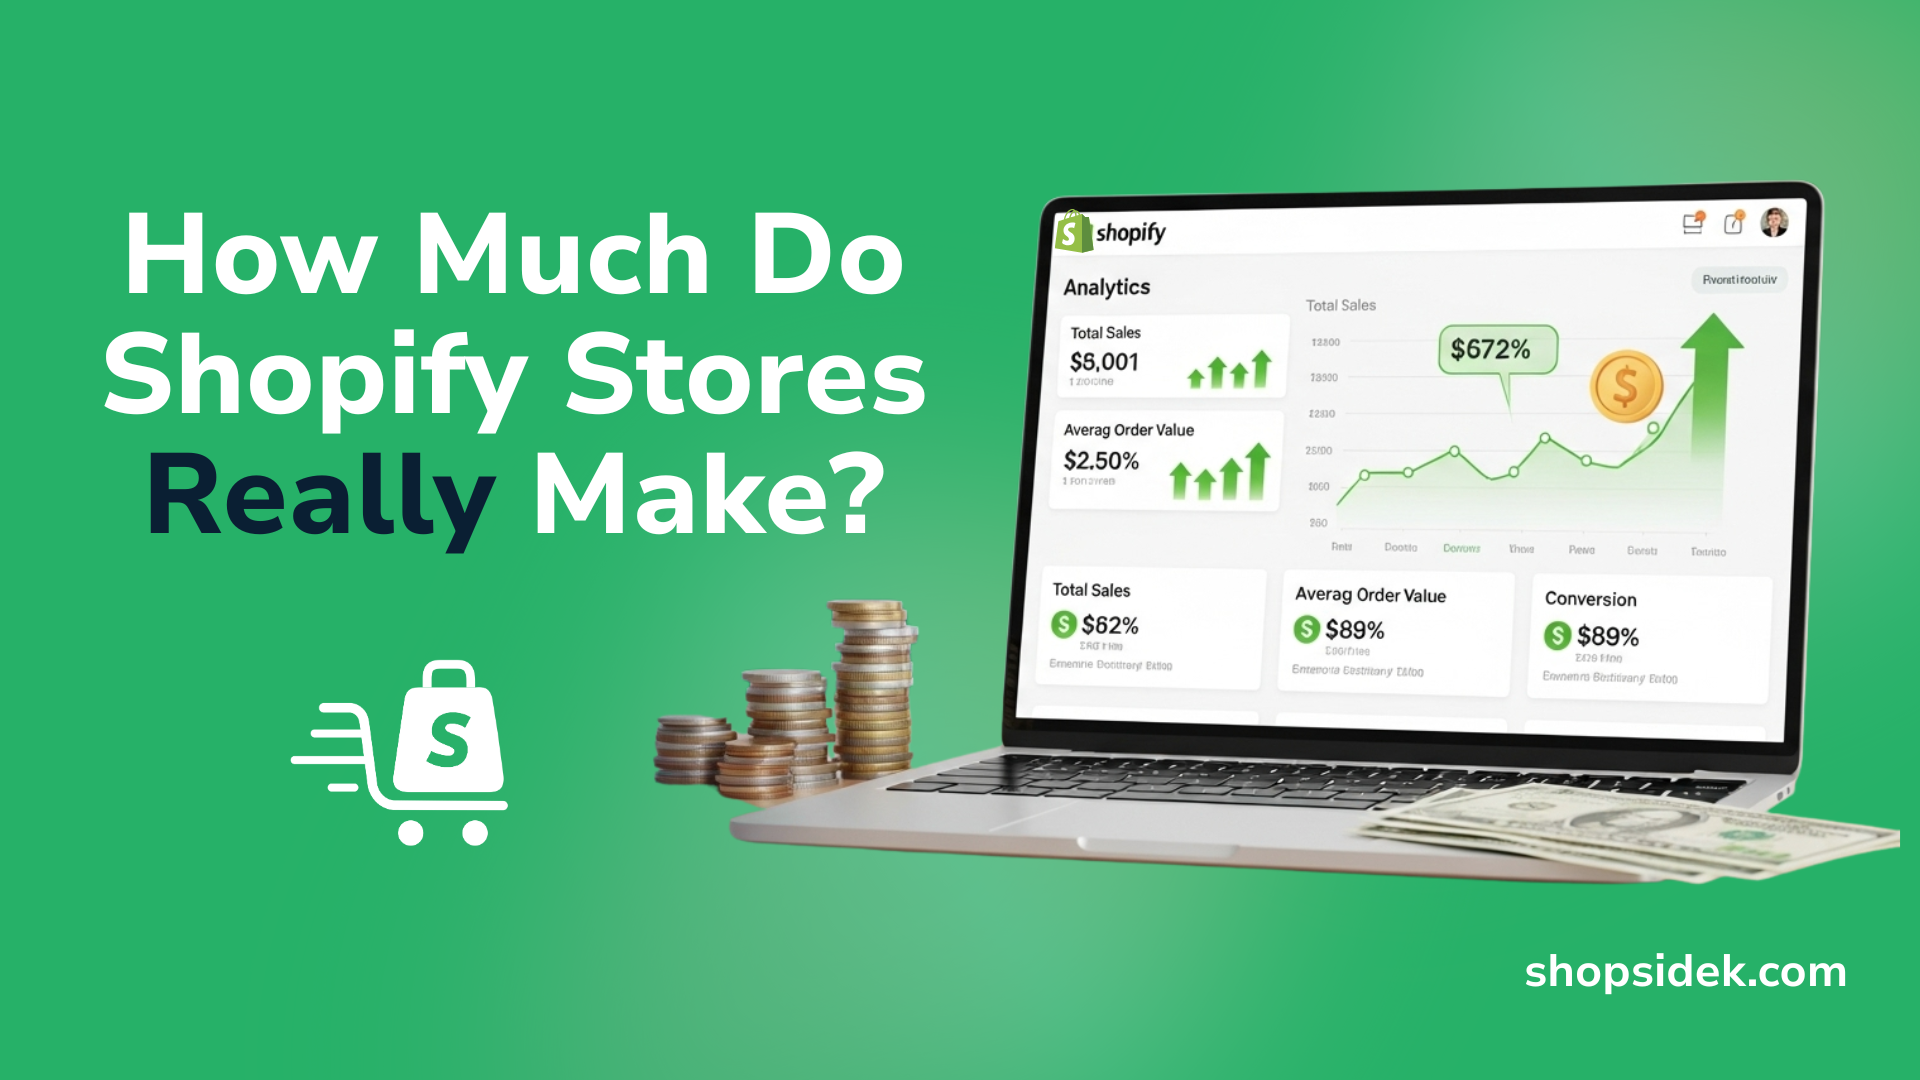
⚡ ShopSideK Verdict
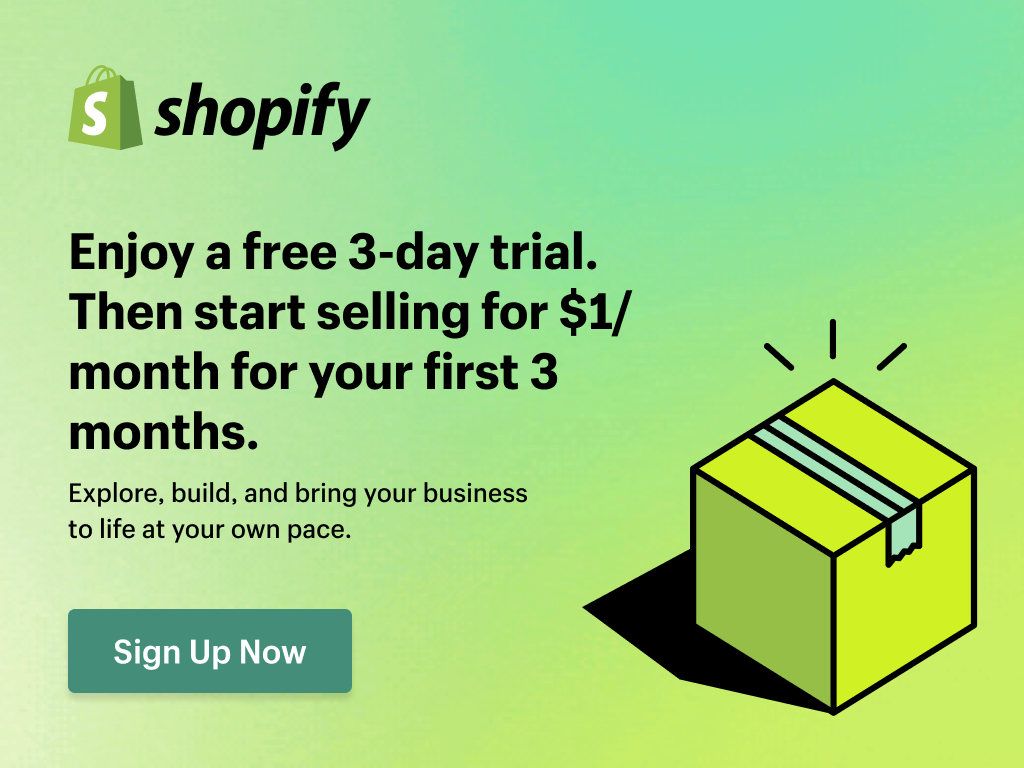
The standard Shopify free trial begins with a 3-day free period. After that, you can activate the promotional plan to get your first 3 months for just $1 per month. This gives you a 90-day runway to build and launch your business for a total cost of $3. To make the most of your trial, follow our structured 90-day plan: prioritize product sourcing with low-risk apps like FFOrder (Free setup + $15 coupon), drive traffic via social channels, and optimize checkout conversion rates before the trial ends.
Phase 1: Foundation & Sourcing
- Set up store theme: Select Dawn or Sense (free & mobile-friendly).
- Source products: Use FFOrder (Dropship) or Printful (POD) to source items without buying inventory.
- Configure settings: Activate Shopify Payments & flat-rate shipping.
Phase 2: Traffic & Marketing
- Set up Shopify Email: Design a welcome automation for new subscribers.
- Connect social channels: Connect Facebook & Instagram for shoppable posts.
- Build social proof: Install Judge.me to gather early product reviews.
Phase 3: Optimize & Decide
- Track Analytics: Monitor visitor sessions and product conversions.
- Optimize checkout: Add brand logo and express payments to checkout pages.
- Make the decision: Evaluate metrics and confidently transition to a paid plan.
Design and print t-shirts, custom apparel, and mugs on-demand with zero upfront inventory cost.
Automate custom dropshipping and sourcing from factory direct suppliers with zero inventory.
Collect and display customer reviews automatically to build immediate buyer trust.
Free 3-day trial · Then $1/month for 3 months · Launch your business today
Every successful online store, from global brands like Gymshark to innovative newcomers like Brooklinen, began with a single step. For thousands of entrepreneurs, that first step is the Shopify free trial—a chance to build a business with minimal risk. It’s more than just a software test; it’s a window of opportunity.
Right now, Shopify’s best offer gives you an initial 3-day free trial, followed by three full months for just $1 per month. This gives you an entire quarter to build, test, and validate your business idea before committing to a full-priced plan.
From my experience, a trial is only as good as the plan you have for it. Many guides show you how to sign up, but this is a complete 90-day roadmap designed to turn your idea into a real, operational business. For a deeper dive into the legal and logistical side of things, you can pair this timeline with our complete Shopify business playbook.
We’ll walk you through a three-phase plan covering your foundation, your first marketing campaigns, and the path to your first sale. Think of this as your strategic launchpad. Let’s get started!
Is the Shopify $1 for 3 Months Trial Worth It? A 60-Second Verdict
If you ask me, for anyone serious about starting an online business, the answer is an emphatic yes.
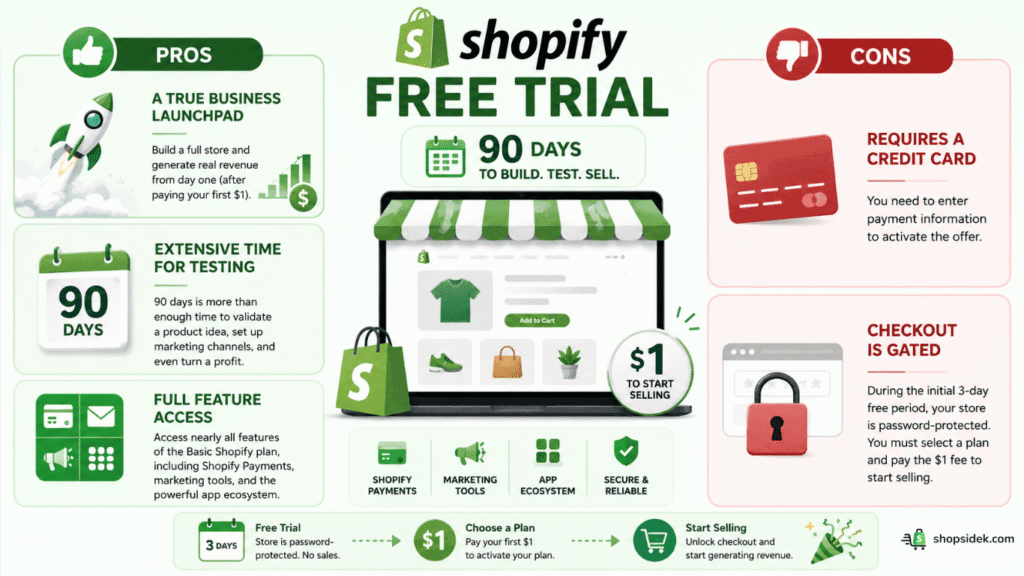
While not technically “3 months free“, the structure of Shopify’s trial—three days to explore, followed by 90 days of full access for just $1 per month—is one of the most generous and practical offers available for aspiring entrepreneurs.
Here’s a quick breakdown of the Shopify free trial:
Pros:
- A True Business Launchpad: Unlike trials that block sales, Shopify lets you build a full store and generate real revenue from day one (after paying your first $1).
- Extensive Time for Testing: 90 days is more than enough time to validate a product idea, set up marketing channels, and even turn a profit before committing to a full-priced plan.
- Full Feature Access: You get access to nearly all the features of the Basic Shopify plan, including Shopify Payments, marketing tools, and the powerful app ecosystem.
Cons:
- Requires a Credit Card: You need to enter payment information to activate the offer.
- Checkout is Gated: During the initial 3-day free period, your store is password-protected. You must select a plan and pay the $1 fee to start selling.
How does it stack up against the competition? The key difference is that Shopify’s extended trial is built for selling, not just for building.
Shopify Trial vs. The Competition
| Feature | Shopify | BigCommerce | Wix |
|---|---|---|---|
| Trial Length | 3 days free, then 3 months for $1/mo | 15 days free | 14 days free |
| Cost During Trial | $1 per month (after 3 days) | $0 | $0 |
| Can You Sell? | Yes, fully functional checkout | No, must upgrade to a paid plan | No, must upgrade to a paid plan |
| Transaction Fees | 0% with Shopify Payments | N/A (cannot sell) | N/A (cannot sell) |
Ultimately, the Shopify trial isn’t just a demo – it’s a 90-day runway to launch a real business for the price of a cup of coffee.
The best way to compare is to try it yourself. Start your 3-month Shopify trial for $1 and see how it feels →
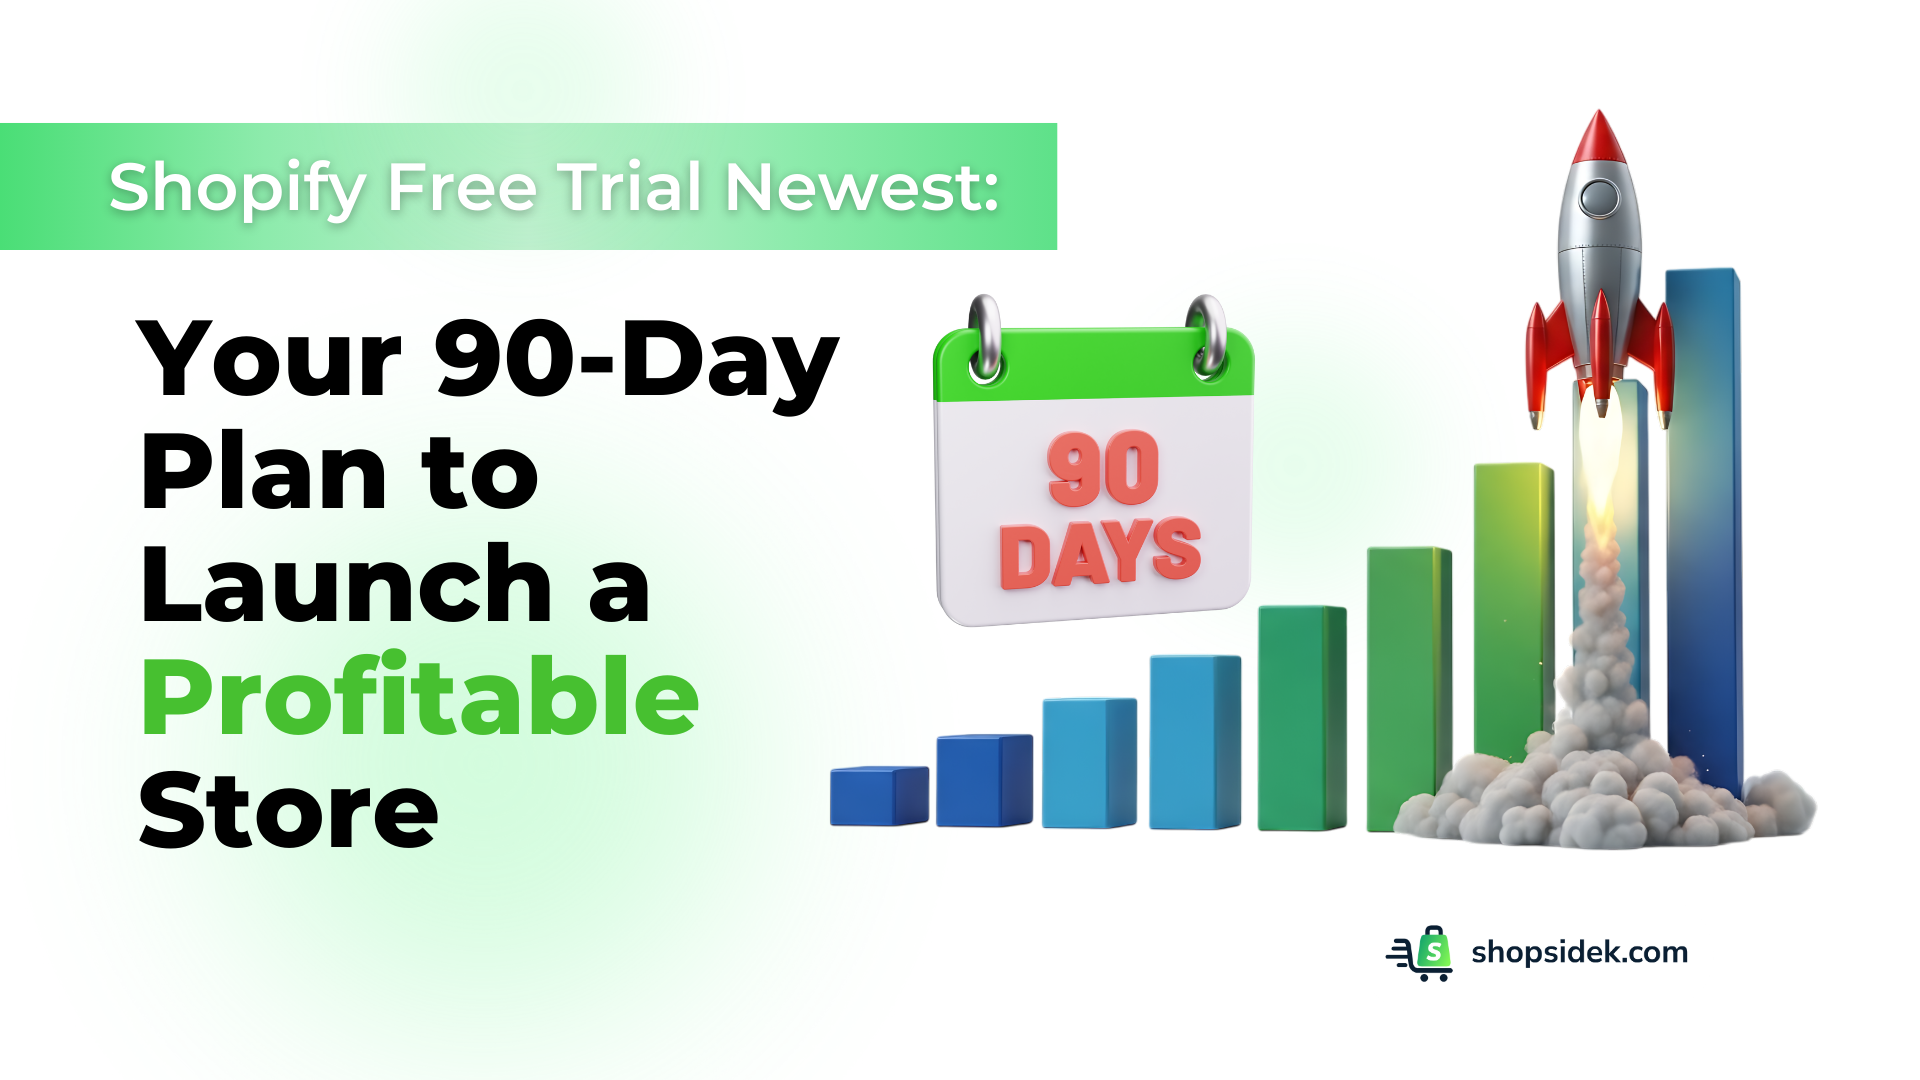
Your 90-Day Shopify Launch Plan: From Idea to First Sale
A 90-day shopify free trial is a powerful asset, but only if you use it with intention. Instead of randomly clicking through settings, follow this three-phase plan designed to take you from a simple idea to a fully validated online business ready for growth.
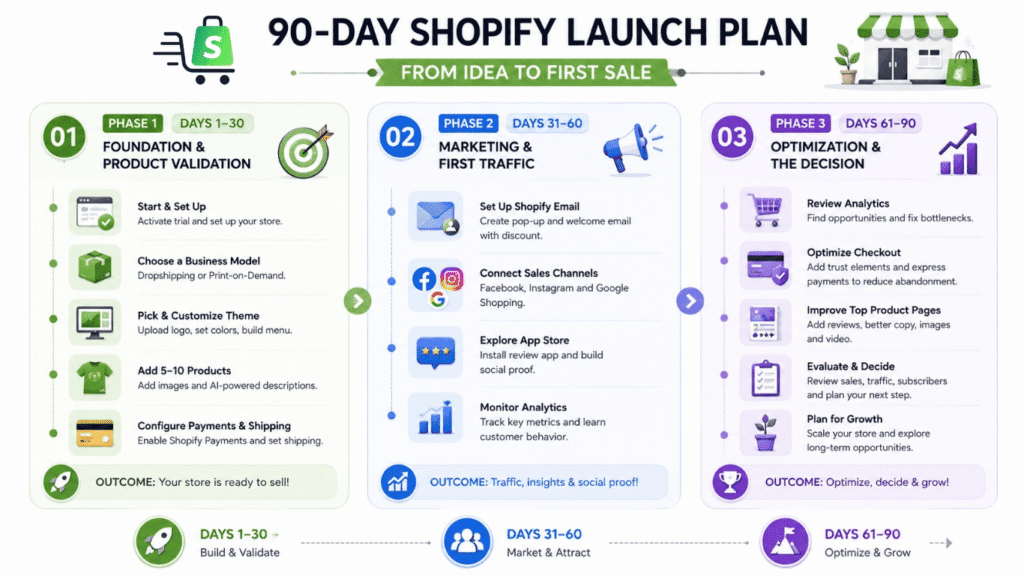
Phase 1 (Days 1-30): Foundation & Product Validation
The first month is all about building a solid foundation. The goal is to create a functional, trustworthy store and confirm that your product idea has potential.
By day 30, you should have a professional-looking site with products ready to sell.
Here is your checklist for the first 30 days:
- Activate the Trial & Initial Setup: Once you start your shopify free trial, the first steps are to choose a store name and answer a few simple questions about your business.
- This initial setup is straightforward and only takes a few minutes.
- Choose a Business Model: You don’t need a garage full of inventory to start. Shopify excels with low-risk models like dropshipping and print-on-demand.
- You can install an app like FFOrder (free to install + $15 coupon) to source products from suppliers who ship directly to your customers, or use a service like Printful to sell custom-designed apparel and accessories with no upfront cost.
- I recommend you use this first month to test one of these models.
- Select and Customize a Theme: A great theme builds trust. Head to the Shopify Theme Store and choose a free theme like Dawn or Sense.
- They are fast, mobile-friendly, and highly customizable. Focus on uploading a clean logo, choosing brand colors, and creating a simple, easy-to-navigate menu.
Want to know more about efficient themes and the beautiful stores they power? Let’s explore our 50 store examples blog.
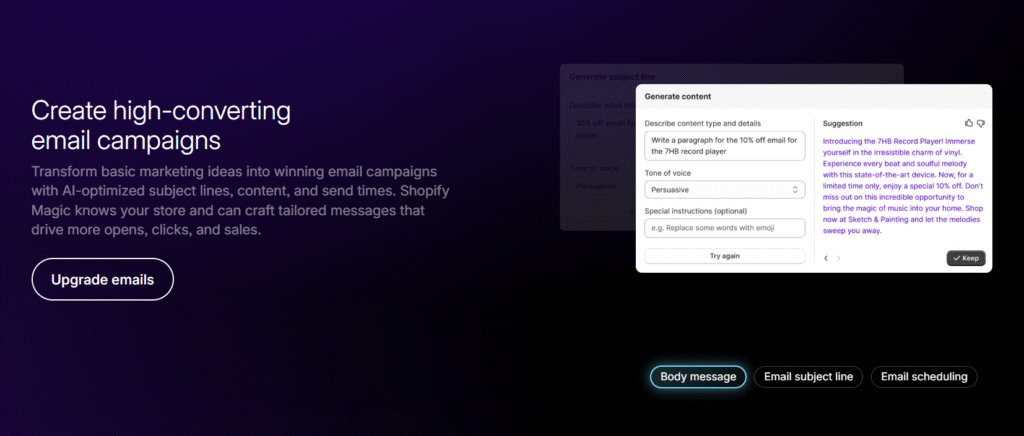
- Add Your First 5-10 Products: Your goal is to create a compelling catalog, not a massive one. For each product, upload high-quality images and use Shopify Magic—Shopify’s built-in AI tool—to help you write engaging and SEO-friendly product descriptions.
- Configure Payments and Shipping: This is crucial for making your store operational. Activate Shopify Payments with one click to accept all major credit cards and avoid additional transaction fees.
- It’s also wise to enable PayPal as a secondary option, as many customers trust it. Finally, set up your basic shipping rates. In practice, a simple flat rate or free shipping over a certain order value is a great place to start.
Phase 2 (Days 31-60): Marketing & First Traffic
With your store built, the second month is about shifting from architect to marketer. The objective here is to drive your first visitors to the site and learn how they behave. You can’t make sales if no one knows you exist.
Your checklist for days 31-60 includes:
- Set Up Shopify Email: Email marketing is a powerful asset, and Shopify has a great free tool built right in.
- Use Shopify Email to design a simple email capture pop-up for your site and create a “welcome automation”—a single email that automatically sends to new subscribers, perhaps with a small discount to encourage their first purchase.
- Connect Social Media Sales Channels: Sell where your customers are. Connect your Shopify store to Facebook and Instagram to create shoppable posts and product tags.
- You can also connect the Google channel, which can help your products appear in Google Shopping results over time.
- Explore the Shopify App Store: The App Store is your secret weapon for adding new features. For this phase, focus on building social proof.

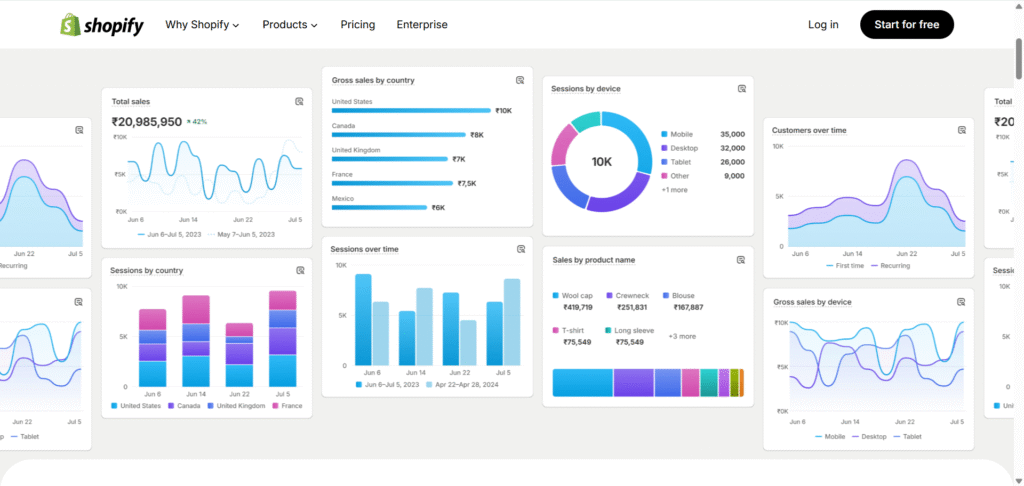
- Learn to Read Your Analytics: I know how tricky it can be, so don’t be intimidated by data. Log into Shopify Analytics every few days and focus on three core metrics:
- Online Store Sessions (how many people are visiting)
- Conversion Rate (what percentage are buying)
- Top Products (what are people most interested in).
- This data is the foundation for your optimization efforts in the next phase.
Phase 3 (Days 61-90): Optimization & The Decision
The final month is about refining your strategy based on real data and making an informed decision about the future of your business. By the end of this phase, you’ll know if your concept has legs and be ready to confidently move forward with a paid plan.
Your checklist for the final 30 days:
- Review Analytics for Insights: Look at the data you’ve gathered and ask critical questions:
- Where is your traffic coming from?
- Which social media posts drove the most clicks?
- Are visitors abandoning their carts at checkout?
The answers will tell you exactly where to focus your efforts.
Optimize Your Checkout Page: If your analytics show cart abandonment at checkout, the fix may be simpler than you think. Take time to optimize your checkout page with your brand’s logo, trust-building button copy, and express payment options. This single optimization can dramatically improve your conversion rate before you ever spend money on ads.
Optimize Your Top Product Pages: Take your most-viewed product and improve its page. Add customer reviews you’ve collected, rewrite the description to answer common questions, add higher-quality images, or even embed a short video. Based on my projects, small tweaks can lead to big improvements in conversion rates.
Evaluate Your Progress: It’s decision time. Have you made sales? If so, great! If not, do you have a steady stream of traffic and email subscribers? Sometimes, success isn’t just revenue—it’s building an audience. Look at the progress and decide if you’re ready to commit to a paid plan.
Think About Long-Term Growth: Remember that even giants like Gymshark started small on Shopify. The platform is built to scale with you, whether that means upgrading to a plan like Shopify Plus in the future or expanding into physical retail with Shopify POS. This trial is your first step on that journey.
You have the complete 90-day roadmap. It’s time to put it into action. Claim your Shopify trial and start building today →
How to Activate Your Shopify Trial (Step-by-Step Guide)
Activating your Shopify free trial is a straightforward process that takes less than five minutes. Follow these steps to get your store up and running.
- Start Your Free Shopify Trial Here: Begin your Shopify journey using our official partner link. It takes you straight to Shopify’s secure signup page, and it won’t cost you anything extra. We may earn a small commission, which helps us keep creating high-quality content for you.
- Enter Your Email Address: Type your email address into the field and click “Start free trial.”
- Create Your Shopify ID: You’ll be prompted to create a password for your new account. You can also sign up using an existing Google, Facebook, or Apple account for faster access.
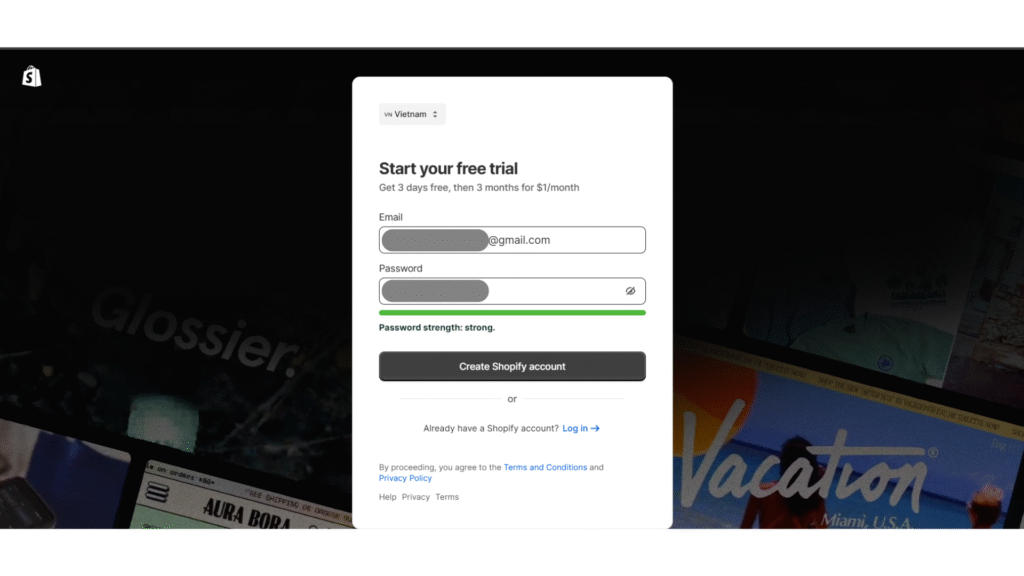
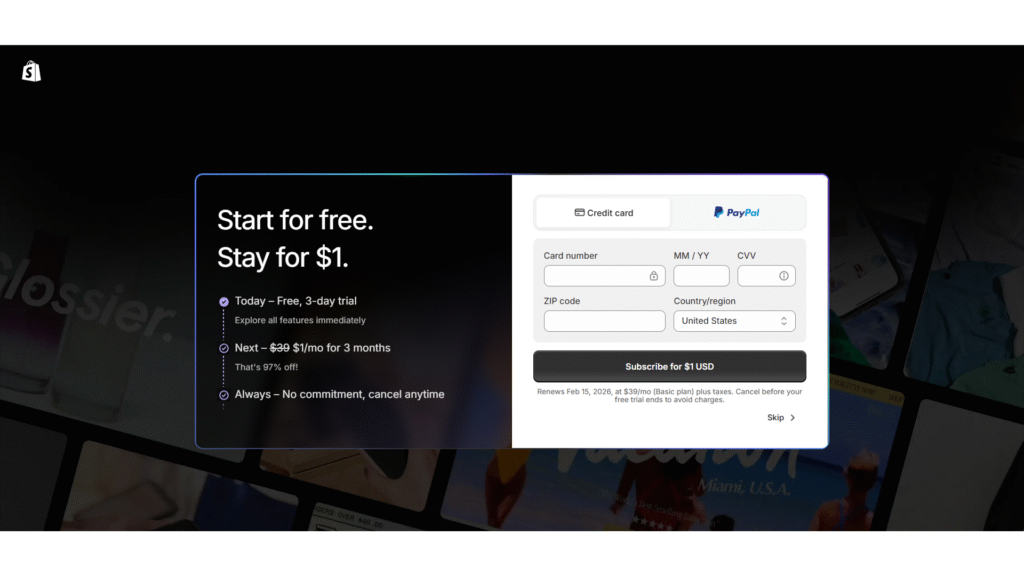
- Enter Payment Information (Optional): You will be asked for payment details (credit card or PayPal), but you can select “Skip” to start your free trial now and provide the information later when you subscribe.
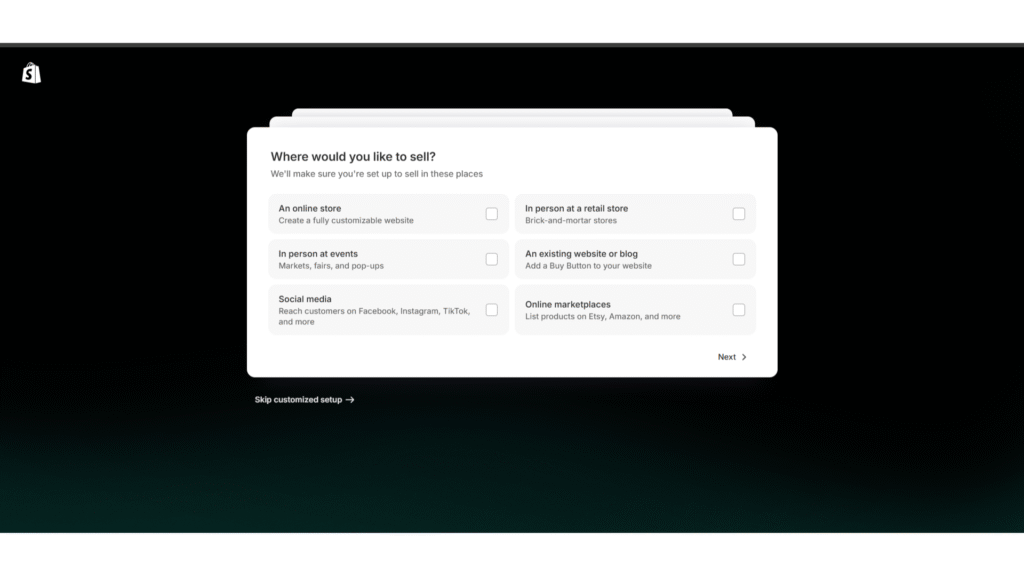
- Answer the Onboarding Questions: Shopify will ask a few simple questions to understand your business, such as what you plan to sell and where. These answers help tailor the dashboard for you, but you can always change them later.
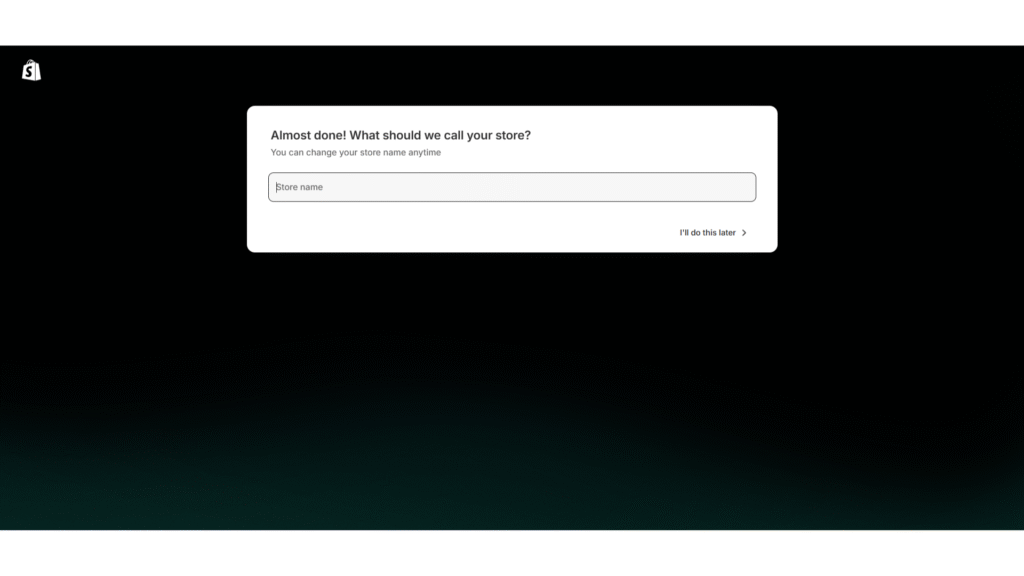
- Enter your business name: Enter your business name to create an initial domain or you can skip it. Don’t worry, you can easily change both the business name and the domain later.
- Let Shopify Build Your Store: After you create your account, Shopify will take a moment to build your new store’s backend. This process is fully automated
- Arrive at Your Dashboard: You’re in! You will land on your new Shopify admin dashboard. From here, you can start adding products, choosing a theme, and setting up your store.
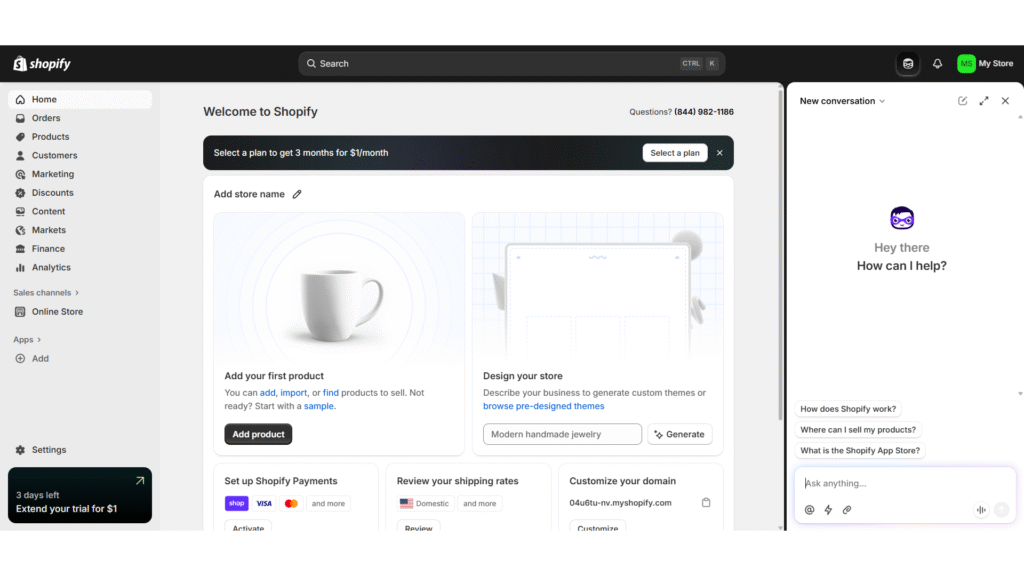
- Pick a Plan to Start Selling: To remove the password protection from your store and start making sales, you need to select a plan. A banner at the bottom of your dashboard will prompt you to choose one to activate the $1/month for 3 months offer.

An Alternative for Black Business Owners:
It’s also worth noting that Shopify, in partnership with Operation Hope, offers a special extended trial through the 1 Million Black Businesses (1MBB) initiative.
Eligible entrepreneurs can access a 120-day trial, providing even more time to build and launch their online store.
What Happens When Your Trial Ends? Planning Your Next Move
As you approach the end of your 90-day trial, you’ll need to decide on your next step. This isn’t a pass/fail test; it’s a strategic decision about what’s best for your business right now. Whether you’re ready to launch, need more time, or want to step back, you have flexible options.
Option 1: Choosing a Paid Plan & Budgeting for It
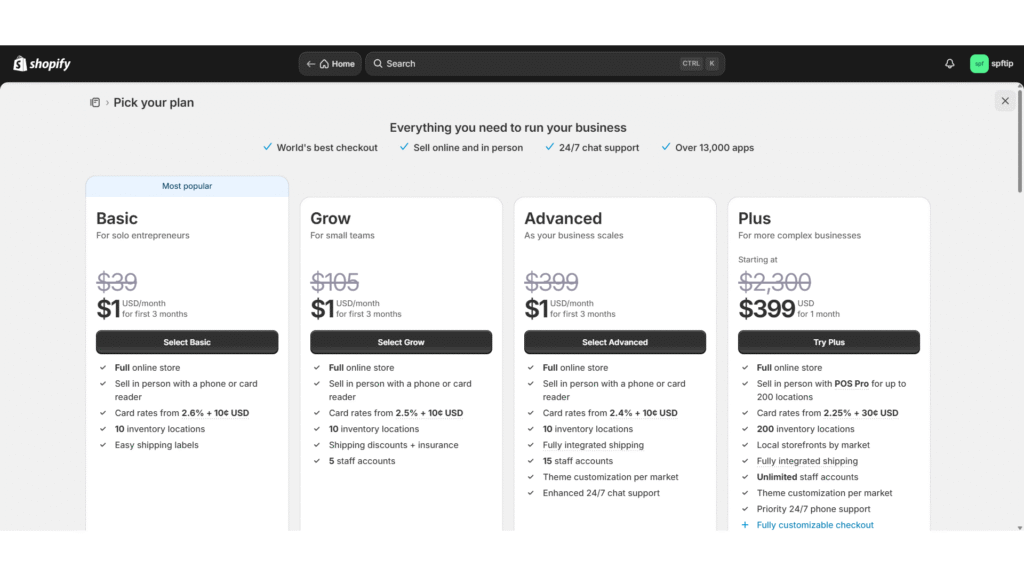
If you’ve validated your idea and are ready to grow, it’s time to choose a paid plan. Most new businesses start with one of three core plans: Basic, Grow, or Advanced.
In my experience, the Basic plan is typically sufficient for new stores, offering everything you need to sell products, process payments, and market your business.
To avoid surprises, it’s crucial to budget for your total monthly cost, which is more than just the plan fee. Use this simple framework to estimate your real expenses:
Your Post-Trial Budget = Plan Fee + App Fees + Transaction Fees
- Plan Fee: The base cost of your chosen Shopify plan.
- App Fees: The monthly cost of any paid apps you’ve installed. Budget for 2-3 essentials, like an email marketing or product review app.
- Transaction Fees: If you’re not using Shopify Payments, you’ll pay a small percentage on each sale. Even with Shopify Payments, there are standard credit card processing fees to account for.
This simple calculation gives you a much more realistic picture of your monthly investment and helps you plan for profitability.
To get a precise estimate based on your specific industry and sales volume, use our Shopify pricing calculator to run the numbers before your trial ends.
Option 2: Pausing, Extending, or Canceling Your Store
If you’re not quite ready to launch fully but don’t want to lose your work, you have several smart alternatives to simply canceling.
- Pause Your Store: Shopify offers a “Pause and Build” plan for a significantly reduced monthly fee.
- This option disables your store’s checkout but keeps your admin panel fully accessible. You can continue to customize your theme, add products, and work on your site until you’re ready to go live.
- Ask for an Extension: If you feel you’re on the brink of success but just need a little more time, it’s often worth contacting Shopify Support. As many sellers have found, they may be willing to grant a short extension to your trial period.
- Cancel Your Store: If you decide Shopify isn’t the right fit, you can cancel your account.
- Don’t skip the steps needed to make a clean exit without loose ends or unexpected charges. If you’re trying to cancel your Shopify free trial the right way, be sure to go through this pre-cancellation checklist first:
- Back up your store data: Export your product and customer CSV files.
- Transfer your custom domain: If you bought a domain through Shopify, make sure you transfer it to another registrar so you don’t lose it.
- Uninstall your apps: Delete all third-party apps to ensure you aren’t billed for them separately after closing your store.
- Don’t skip the steps needed to make a clean exit without loose ends or unexpected charges. If you’re trying to cancel your Shopify free trial the right way, be sure to go through this pre-cancellation checklist first:
Shopify Free Trial FAQ
Can I make money during the Shopify free trial?
Yes. Once you select a plan and pay your first $1 to activate the extended trial offer, your store’s checkout becomes fully functional. You can start selling products and generating real revenue immediately.
How long is Shopify free trial?
Currently, the standard offer begins with a 3-day free period. After that, you can opt into a promotional plan that gives you the next three months for just $1 per month, totaling over 90 days to build and launch your store.
What features are included in the Shopify free trial?
The trial gives you access to nearly all the features of the Shopify plan you select (most new users start with the Basic plan). This includes building a full online store, using Shopify Payments to process transactions, accessing the Shopify App Store, and using core marketing and analytics tools.
Do I need a credit card to sign up?
While you can start the initial 3-day free trial without a credit card, you will need to provide payment information to activate the extended 3-months-for-$1 offer and begin selling products.
What happens if I don’t pick a plan?
If you do not choose a paid plan by the end of your free trial period, your store will be paused. You will not be able to make any sales, and access to your Shopify admin dashboard will be restricted until you select a plan.
Is there a 90-day free trial?
The current offer is not a 90-day free trial. It is structured as a 3-day free trial, which is then followed by a promotional period where you get your first three months for just $1 per month. This gives you a 90-day runway to build and launch your business for a total cost of $3.